ctx canvas overview
You can use the ctx package to draw lines, shapes, text, and images on a canvas.
This is the same library we use for the premade UI elements, so you can look at examples in the app_components folder.
The docs are based on the mdn web docs which port the ctx library to JavaScript. It provides many more visual examples and we recommend you to look there for further instruction.
Usage
To use the ctx object associated with your app use the draw() or the draw_overlays() methods.
Inside your method, you will generally first want to clear your background with the clear_background() method. That will remove the menu that is otherwise visible and provide you an empty background to start with.
import app

from app_components import clear_background
from events.input import Buttons, BUTTON_TYPES


class ExampleApp(app.App):
    def __init__(self):
        self.button_states = Buttons(self)

    def update(self, delta):
        if self.button_states.get(BUTTON_TYPES["CANCEL"]):
            self.button_states.clear()

    def draw(self, ctx):
        clear_background(ctx)


__app_export__ = ExampleApp
Coordinates of the display area
With ctx, you need to provide a place for where to draw objects using coordinates in the form of (x, y). The x-coordinate represents the horizontal coordinate and the y-coordinate the vertical. The middle is at (0, 0).
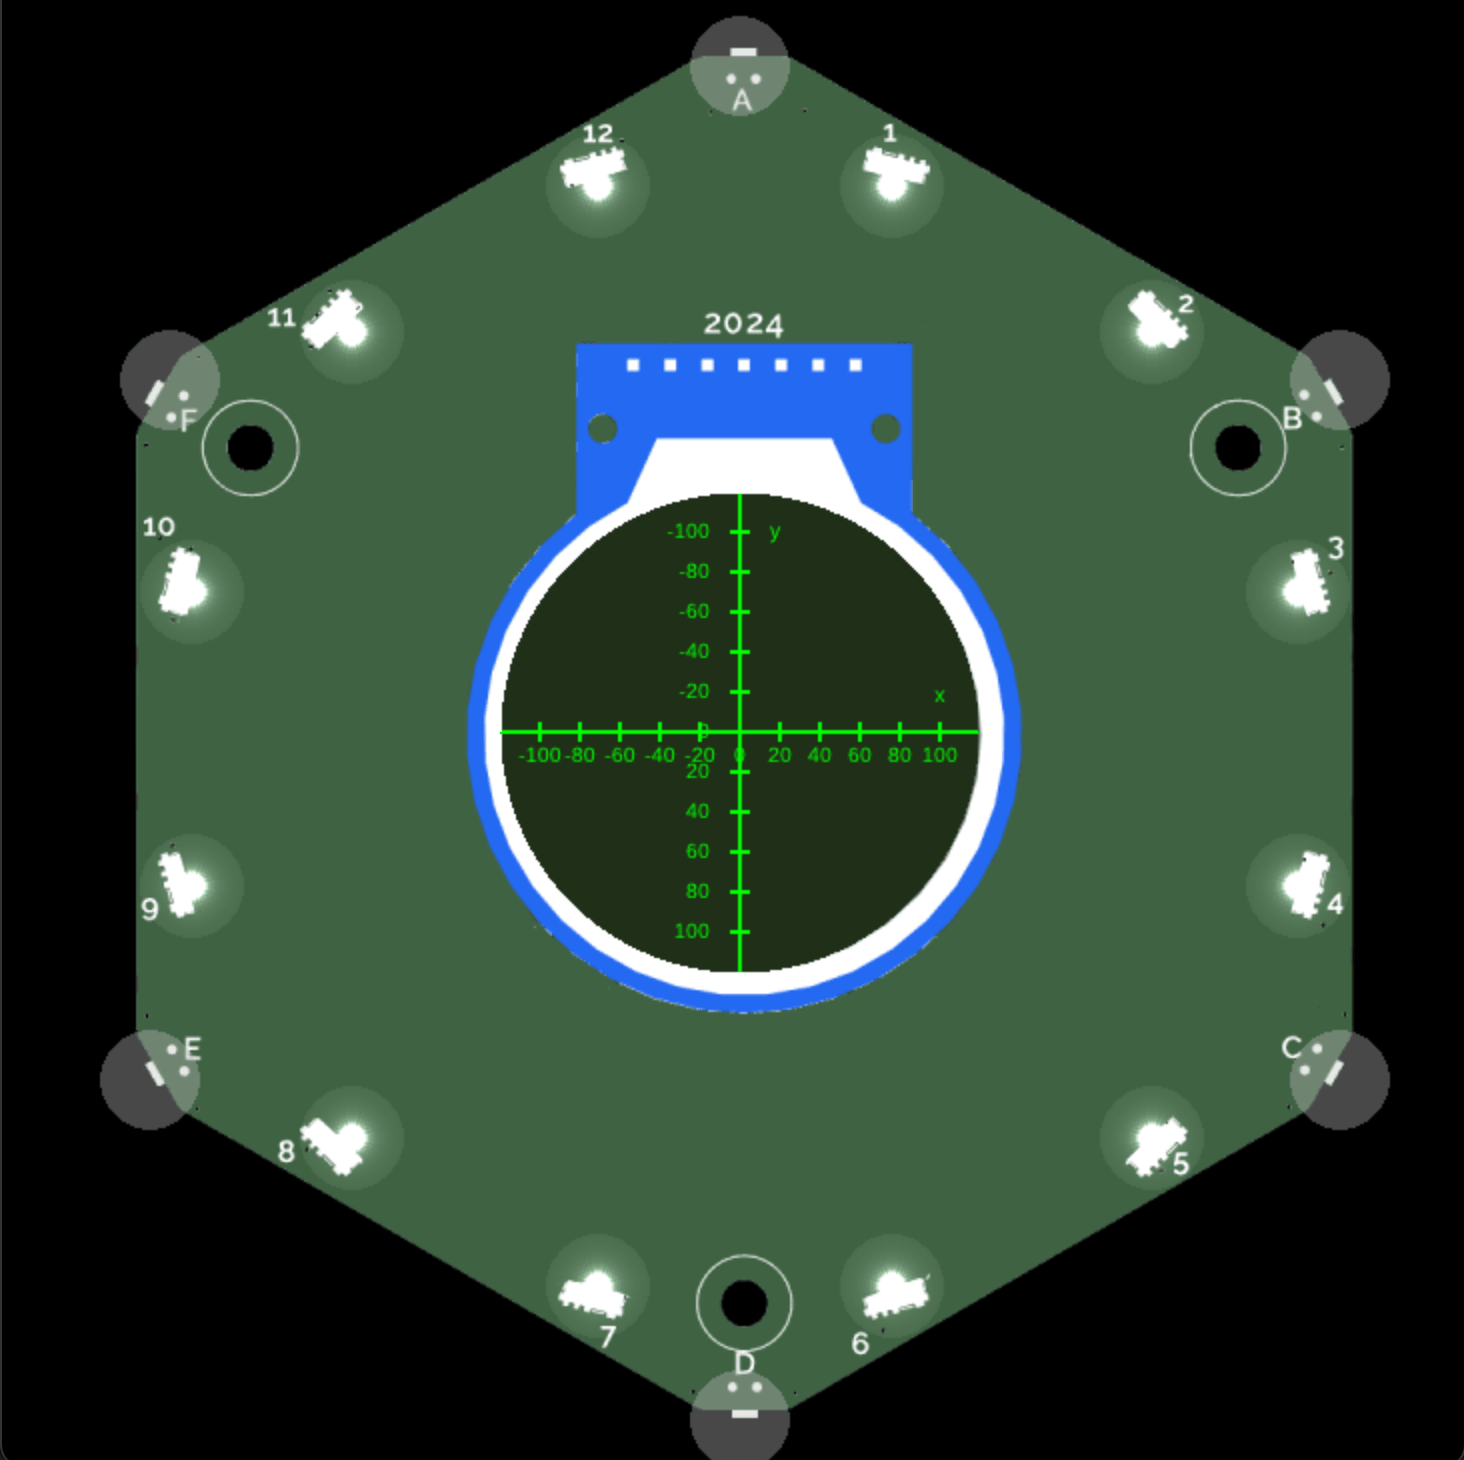
Updating the coordinates
If you use the scale() method you change the coordinates by a scaling factor and the above image will no longer reflect the positions where your objects will be drawn if you provide the associated coordinates.
The following is the code for the axes drawing:
import app

from app_components import clear_background
from events.input import Buttons, BUTTON_TYPES
from app_components.tokens import line_height


class ExampleApp(app.App):
    def __init__(self):
        self.button_states = Buttons(self)

    def update(self, delta):
        if self.button_states.get(BUTTON_TYPES["CANCEL"]):
            self.button_states.clear()

    def draw(self, ctx):
        clear_background(ctx)
        ctx.rgb(0, 1, 0).begin_path()
        ctx.move_to(-120, 0)
        ctx.line_to(120, 0)
        ctx.move_to(0, 120)
        ctx.line_to(0, -120)

        for i in range(-5, 6):
            # draw indicator lines for x
            ctx.move_to(i*20, 5)
            ctx.line_to(i*20, -5)
            # draw indicator lines for y
            ctx.move_to(-5, i*20)
            ctx.line_to(5, i*20)

        # text for x and y
        ctx.stroke()

        for i in range(-5, 6):
            ctx.font_size = 12
            width = ctx.text_width(str(i*20))
            # x axes
            ctx.rgb(0, 1, 0).move_to(i*20 - width/2, 15).text(i*20)
            # y axes
            ctx.rgb(0, 1, 0).move_to(
                -15 - width, i*20 + 2*line_height).text(i*20)

        width = ctx.text_width("y")
        ctx.rgb(0, 1, 0).move_to(+15, -100+2*line_height).text("y")

        width = ctx.text_width("x")
        ctx.rgb(0, 1, 0).move_to(100 - width/2, -15).text("x")


__app_export__ = ExampleApp
State of the canvas
Think of the ctx object as a canvas. The object stores the drawing state of the canvas on a stack. The drawing state consists of:
- The current transformation matrix.
- The current clipping region.
- The current dash list.
-
The current values of the following attributes:
-
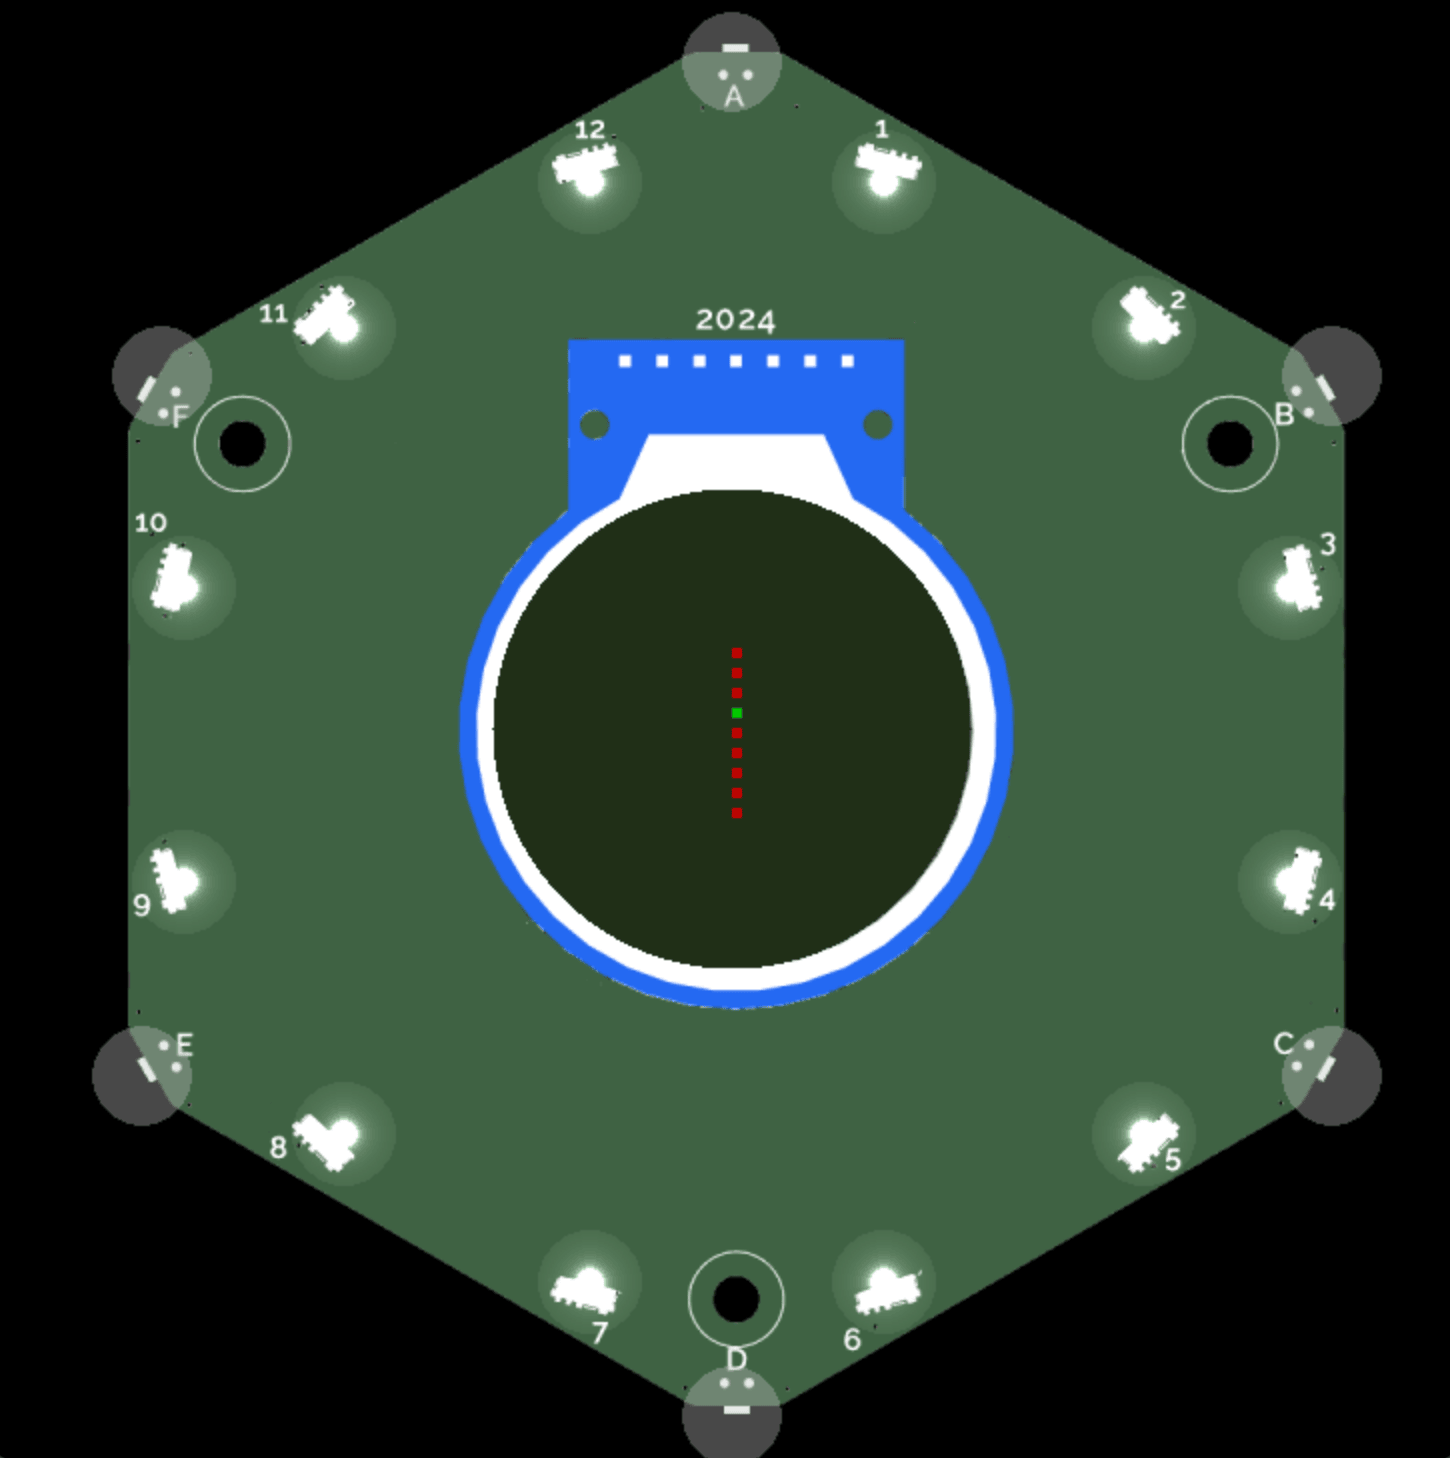
x: The current x coordinate. Think of it as where your cursor is on the canvas, ready to draw. y: The current y coordinate.-
font: The font to be used for text. Default:"". Options:"Arimo Regular""Arimo Bold""Arimo Italic""Arimo Bold Italic""Camp Font 1""Camp Font 2""Camp Font 3""Material Icons""Comic Mono"
-
font_size: The font size to be used for text. Default:10.0. global_alpha: The alpha (transparency) value that is applied to shapes and images before they are drawn onto the canvas. Default:1.0.-
text_align: The alignment to be used for text. Default:ctx.START. Options:ctx.RIGHT: The text is right-aligned.ctx.LEFT: The text is left-aligned.ctx.JUSTIFY: The text is justified.ctx.CENTER: The text is centered.ctx.START: The text is aligned at the normal start of the line (left-aligned for left-to-right locales, right-aligned for right-to-left locales).ctx.END: The text is aligned at the normal end of the line (right-aligned for left-to-right locales, left-aligned for right-to-left locales).
-
text_baseline: The baseline to be used for text. Default"alphabetic". Options:"alphabetic": The text baseline is the normal alphabetic baseline."hanging": The text baseline is the hanging baseline. (Used by Tibetan and other Indic scripts.)"top": The text baseline is the top of the em square."middle": The text baseline is the middle of the em square."bottom": The text baseline is the bottom of the bounding box. This differs from the ideographic baseline in that the ideographic baseline doesn't consider descenders."ideographic": The text baseline is the ideographic baseline; this is the bottom of the body of the characters, if the main body of characters protrudes beneath the alphabetic baseline. (Used by Chinese, Japanese, and Korean scripts.)
line_widthThe line width to be used for drawing lines. Default:1.0.image_smoothing: Determines whether scaled images are smoothed. DefaultTrue.compositing_mode: The current compositing mode.global_alpha: The alpha (transparency) value that is applied to shapes and images before they are drawn onto the canvas.
You can save() the state of the canvas before drawing something on the canvas and restore() the state once you have finished drawing a special item. If for example you want to draw red squares, and then draw one green square, but don't want to have to re-specify the entire state, you can do this:
import app

from app_components import clear_background
from events.input import Buttons, BUTTON_TYPES


class ExampleApp(app.App):
    def __init__(self):
        self.button_states = Buttons(self)

    def update(self, delta):
        if self.button_states.get(BUTTON_TYPES["CANCEL"]):
            self.button_states.clear()

    def draw(self, ctx):
        clear_background(ctx)
        ctx.rgb(0.78, 0, 0)
        ctx.rectangle(0, -40, 5, 5).fill()
        ctx.rectangle(0, -30, 5, 5).fill()
        ctx.rectangle(0, -20, 5, 5).fill()
        ctx.save()
        ctx.rgb(0, 0.78, 0).rectangle(0, -10, 5, 5).fill()
        # Restore to the state saved by the most recent call to save()
        ctx.restore()
        ctx.rectangle(0, 0, 5, 5).fill()
        ctx.rectangle(0, 10, 5, 5).fill()
        ctx.rectangle(0, 20, 5, 5).fill()
        ctx.rectangle(0, 30, 5, 5).fill()
        ctx.rectangle(0, 40, 5, 5).fill()


__app_export__ = ExampleApp
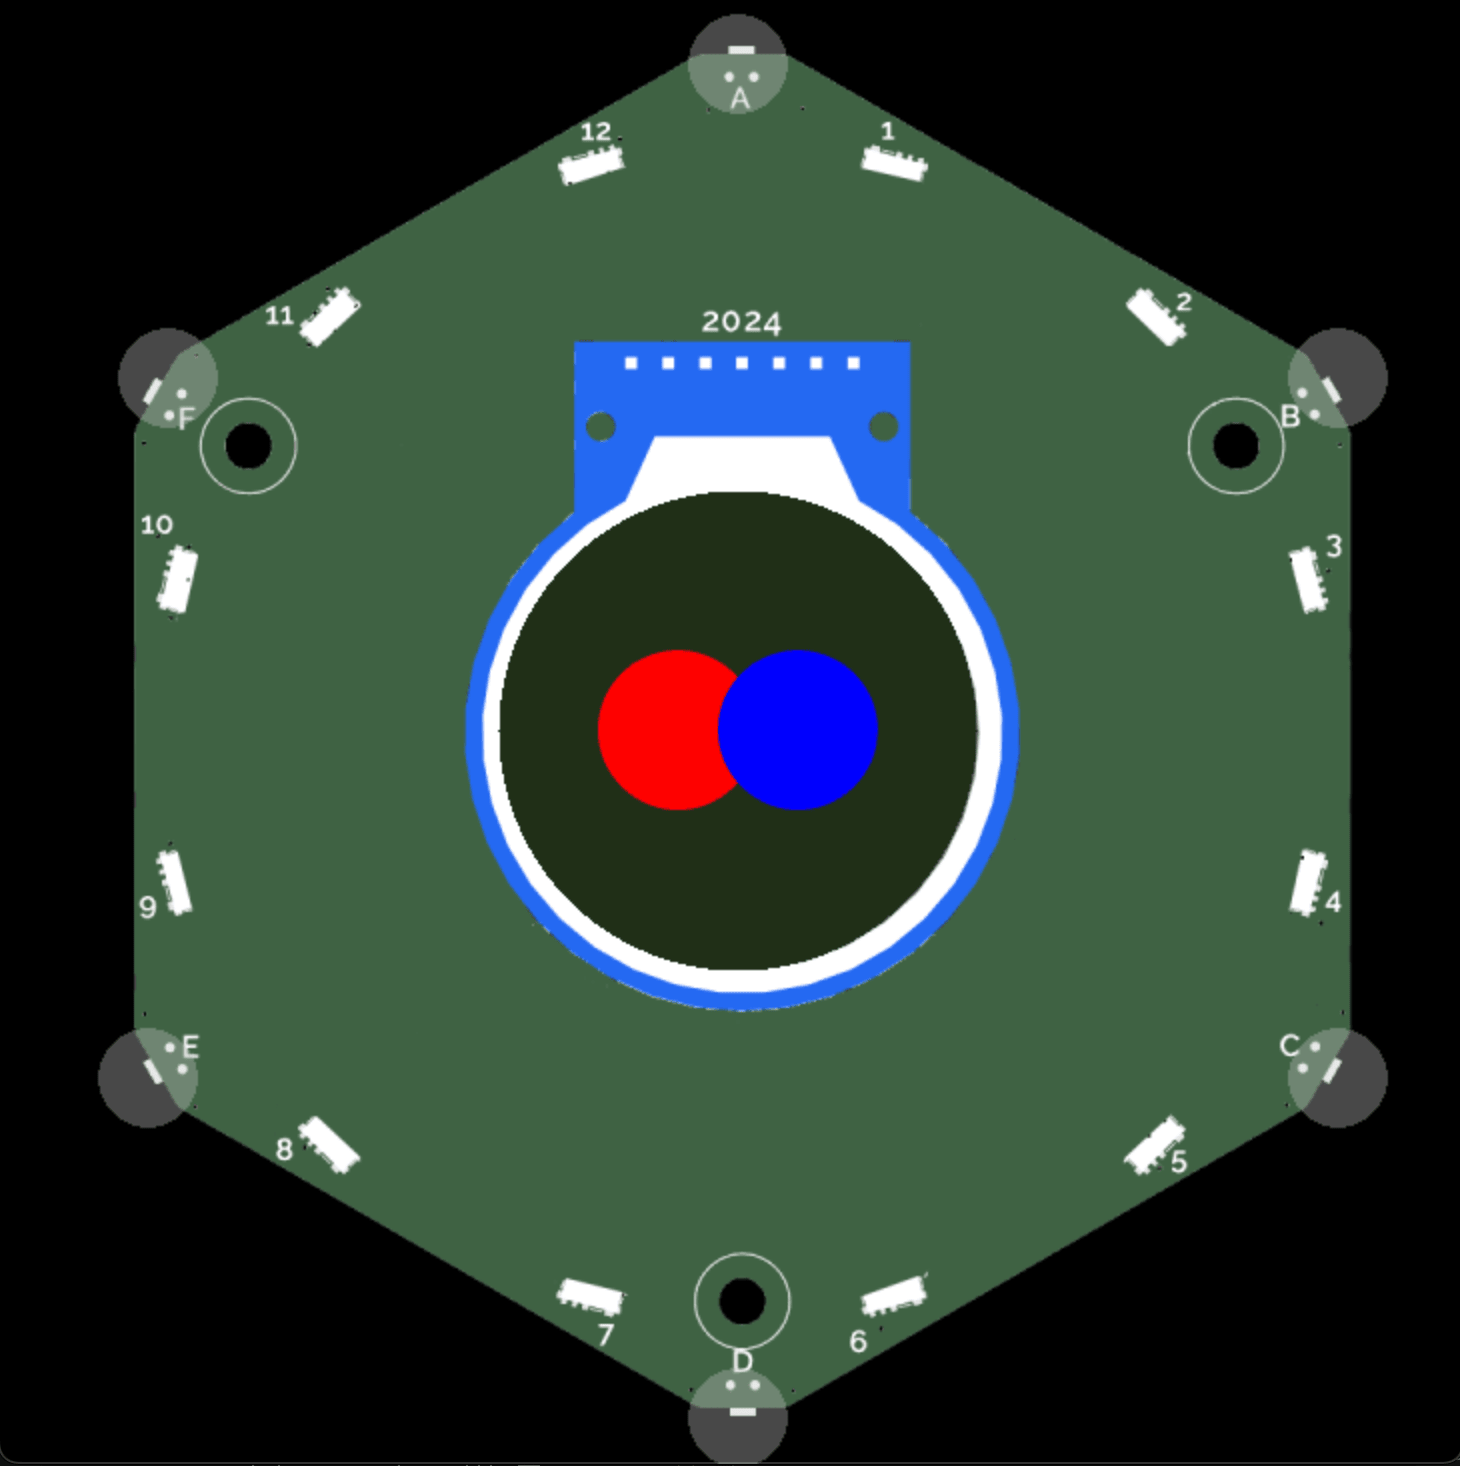
Color and opacity
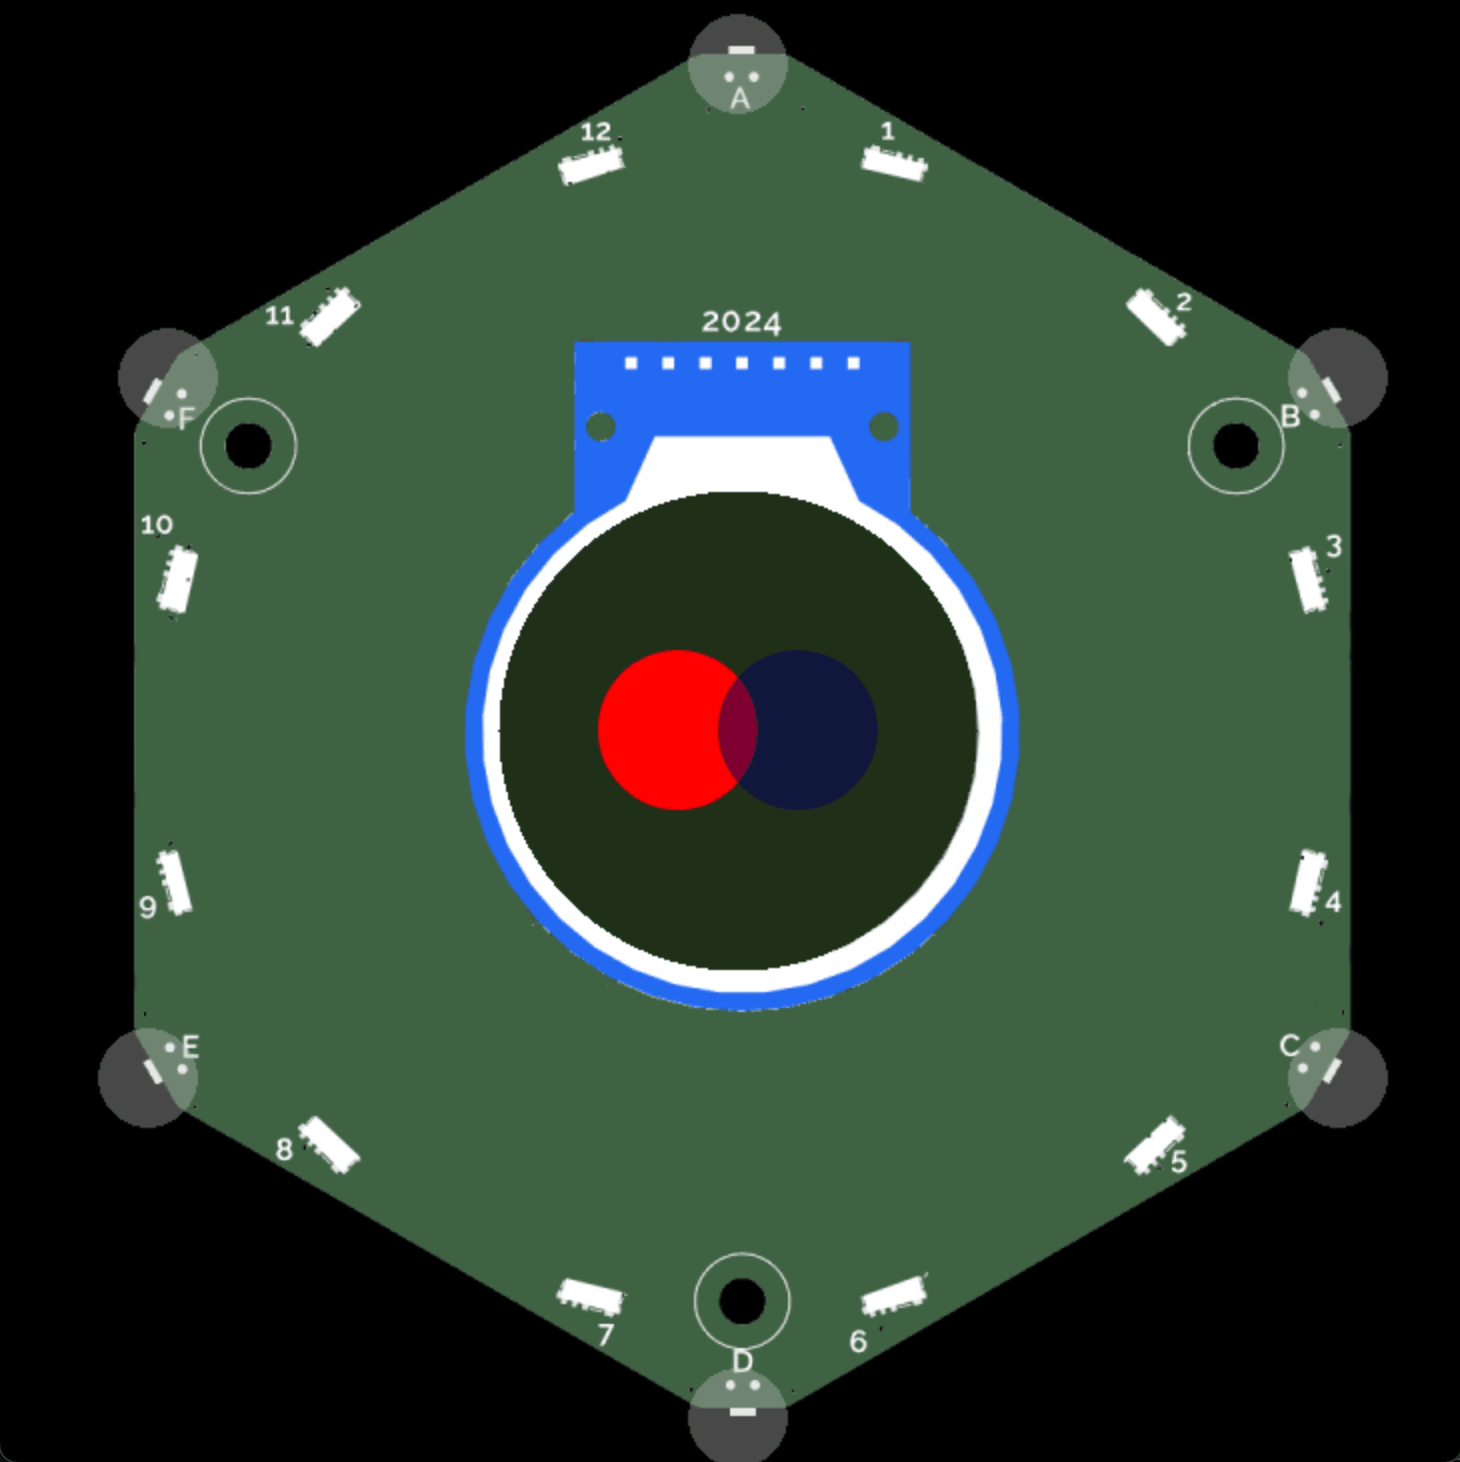
This example places two circles next to each other with some overlap. One is colored red and the other blue. The blue circle is on top of the red circle and where they overlap, only the blue of the blue circle is visible.
import app
import math

from app_components import clear_background
from events.input import Buttons, BUTTON_TYPES


class ExampleApp(app.App):
    def __init__(self):
        self.button_states = Buttons(self)

    def update(self, delta):
        if self.button_states.get(BUTTON_TYPES["CANCEL"]):
            self.button_states.clear()

    def draw(self, ctx):
        clear_background(ctx)
        ctx.save()

        # red left circle
        ctx.rgb(1, 0, 0).arc(-30, 0, 40, 0, 2 * math.pi, True).fill()

        # blue right circle
        ctx.rgb(0, 0, 1).arc(30, 0, 40, 0, 2 * math.pi, True).fill()

        ctx.restore()


__app_export__ = ExampleApp
You can add opacity to colors by using the rgba() method which makes the color translucent. You can specify the opacity on a scale from 0 (entirely see-through) to 1.0 (not see-through at all).
import app
import math

from app_components import clear_background
from events.input import Buttons, BUTTON_TYPES


class ExampleApp(app.App):
    def __init__(self):
        self.button_states = Buttons(self)

    def update(self, delta):
        if self.button_states.get(BUTTON_TYPES["CANCEL"]):
            self.button_states.clear()

    def draw(self, ctx):
        clear_background(ctx)
        ctx.save()

        # red left circle
        ctx.rgba(1, 0, 0, 1).arc(-30, 0, 40, 0, 2 * math.pi, True).fill()

        # blue right circle, 50% opacity
        ctx.rgba(0, 0, 0.4, 0.5).arc(30, 0, 40, 0, 2 * math.pi, True).fill()

        ctx.restore()


__app_export__ = ExampleApp
Gradients: radial and linear
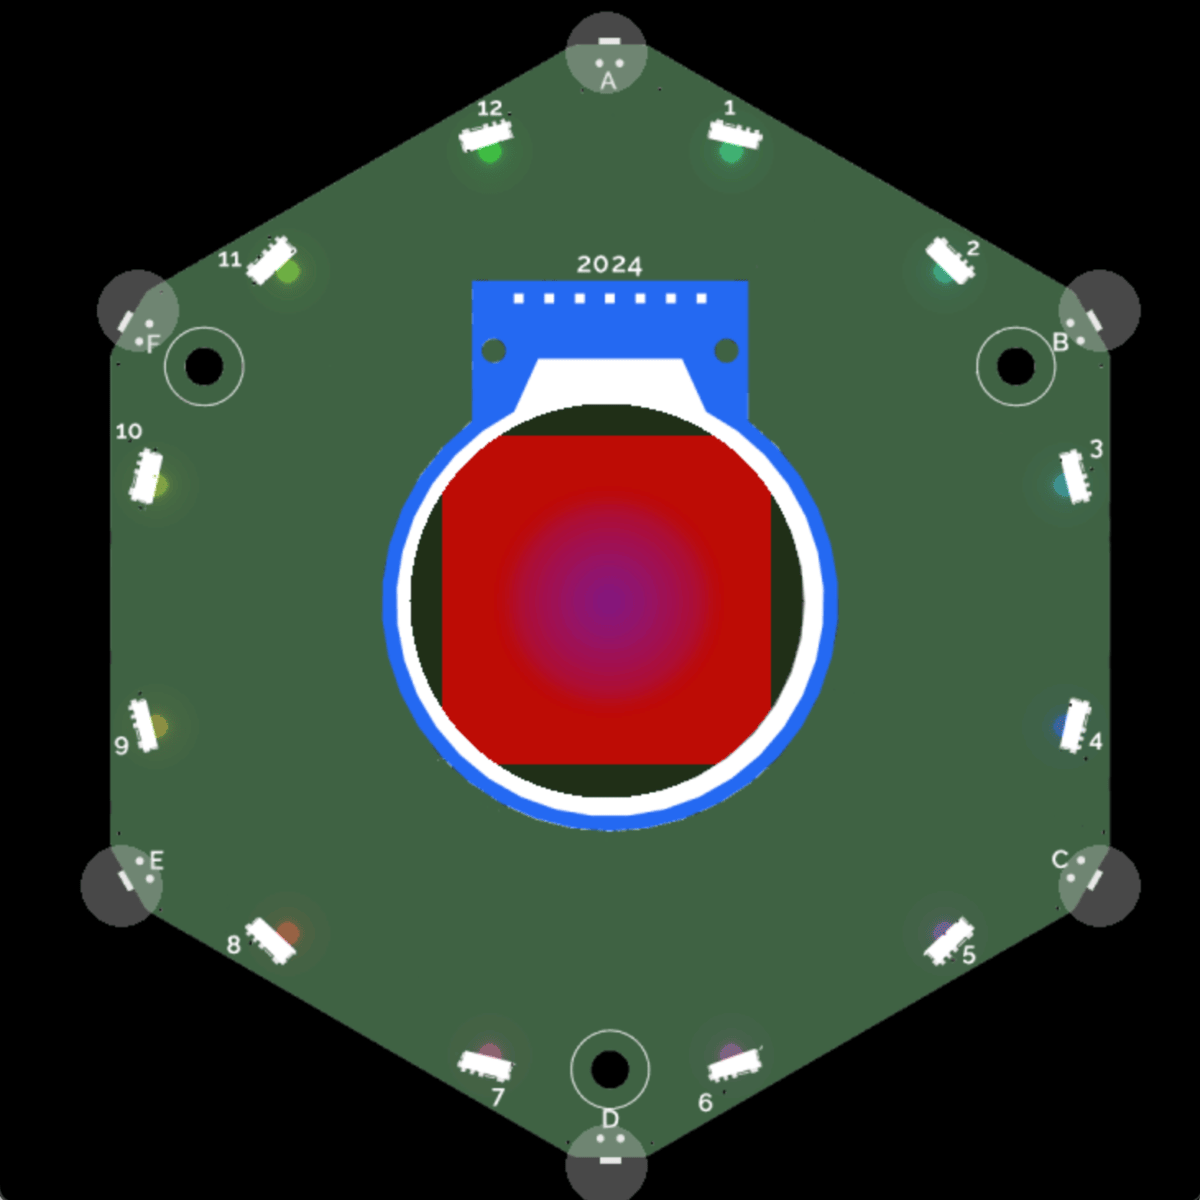
This example shows an example of a radial gradient on a rectangle.
import app

from app_components import clear_background
from events.input import Buttons, BUTTON_TYPES


class ExampleApp(app.App):
    def __init__(self):
        self.button_states = Buttons(self)

    def update(self, delta):
        if self.button_states.get(BUTTON_TYPES["CANCEL"]):
            self.button_states.clear()

    def draw(self, ctx):
        clear_background(ctx)
        ctx.save()

        ctx.radial_gradient(30, 30, 80, -30, -50, 70)
        ctx.add_stop(0, (100, 0, 100), 0.5)
        ctx.add_stop(1, (100, 0, 0), 0.8)
        ctx.rectangle(-100, -100, 200, 200).fill()

        ctx.restore()


__app_export__ = ExampleApp
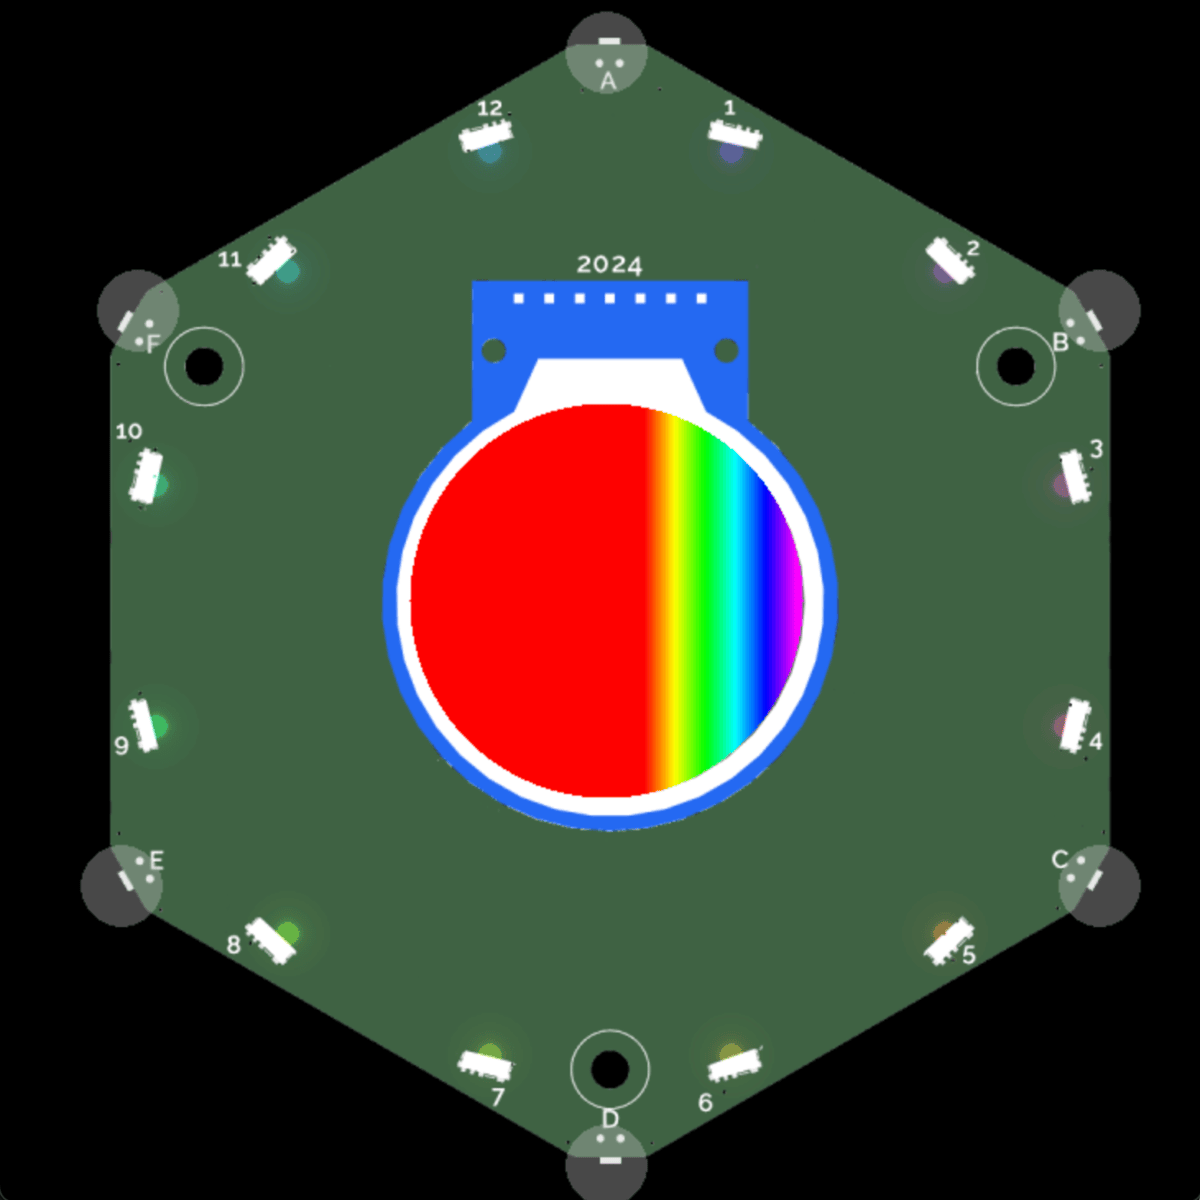
This example shows an example of a linear gradient on a rectangle.
import app

from events.input import Buttons, BUTTON_TYPES


class ExampleApp(app.App):
    def __init__(self):
        self.button_states = Buttons(self)

    def update(self, delta):
        if self.button_states.get(BUTTON_TYPES["CANCEL"]):
            self.minimise()

    def draw(self, ctx):
        ctx.save()
        ctx.linear_gradient(0.18*120, 0.5*120, 0.95*120, 0.5*120)
        ctx.add_stop(0.0, (255, 0, 0), 1.0)
        ctx.add_stop(0.2, (255, 255, 0), 1.0)
        ctx.add_stop(0.4, (0, 255, 0), 1.0)
        ctx.add_stop(0.6, (0, 255, 255), 1.0)
        ctx.add_stop(0.8, (0, 0, 255), 1.0)
        ctx.add_stop(1.0, (255, 0, 255), 1.0)

        ctx.rectangle(-120, -120, 240, 240)
        ctx.fill()

        ctx.restore()


__app_export__ = ExampleApp
Gray
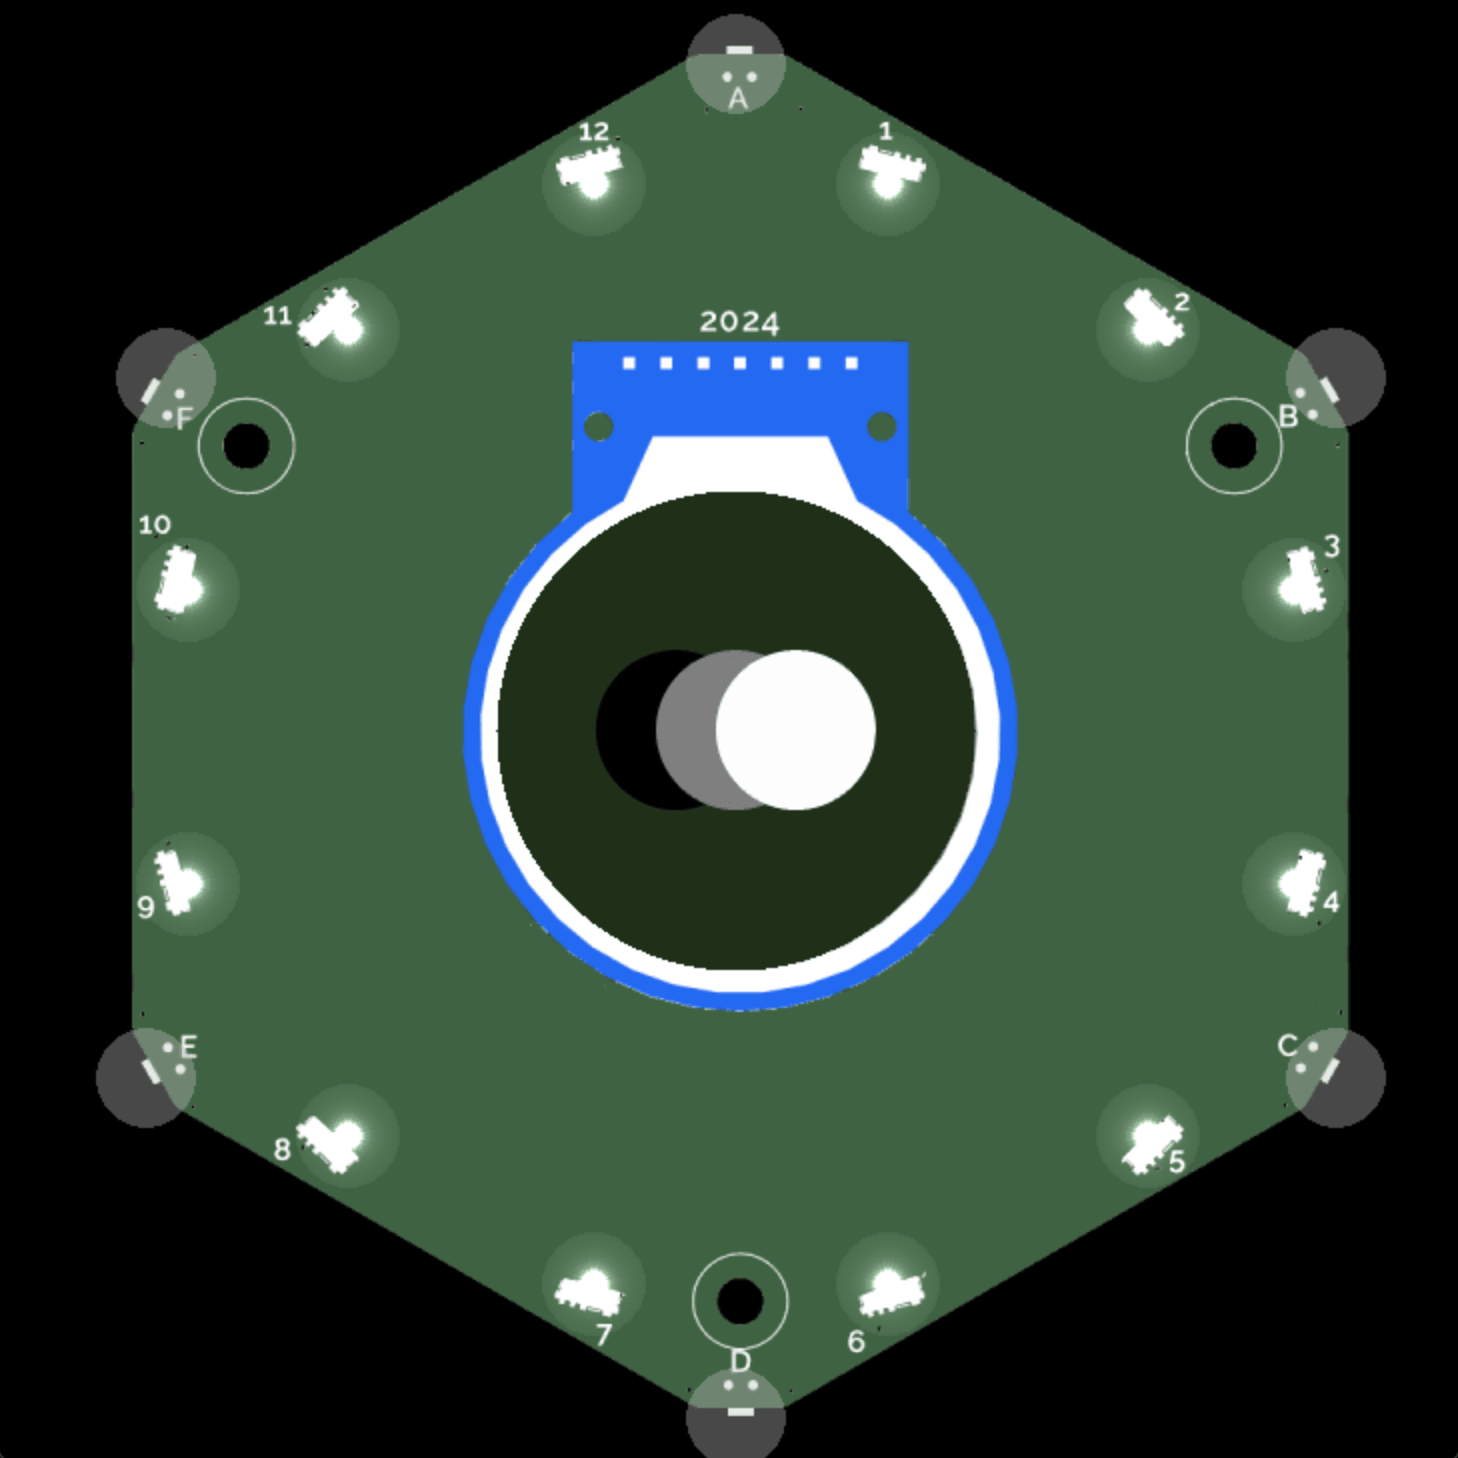
This example places three circles next to each other with some overlap. One is black, the next gray, and the last one white.
import app
import math

from app_components import clear_background
from events.input import Buttons, BUTTON_TYPES


class ExampleApp(app.App):
    def __init__(self):
        self.button_states = Buttons(self)

    def update(self, delta):
        if self.button_states.get(BUTTON_TYPES["CANCEL"]):
            self.button_states.clear()

    def draw(self, ctx):
        clear_background(ctx)
        ctx.save()
        ctx.gray(0.0).arc(-30, 0, 40, 0, 2 * math.pi, True).fill()
        ctx.gray(0.5).arc(0, 0, 40, 0, 2 * math.pi, True).fill()
        ctx.gray(1.0).arc(30, 0, 40, 0, 2 * math.pi, True).fill()
        ctx.restore()


__app_export__ = ExampleApp
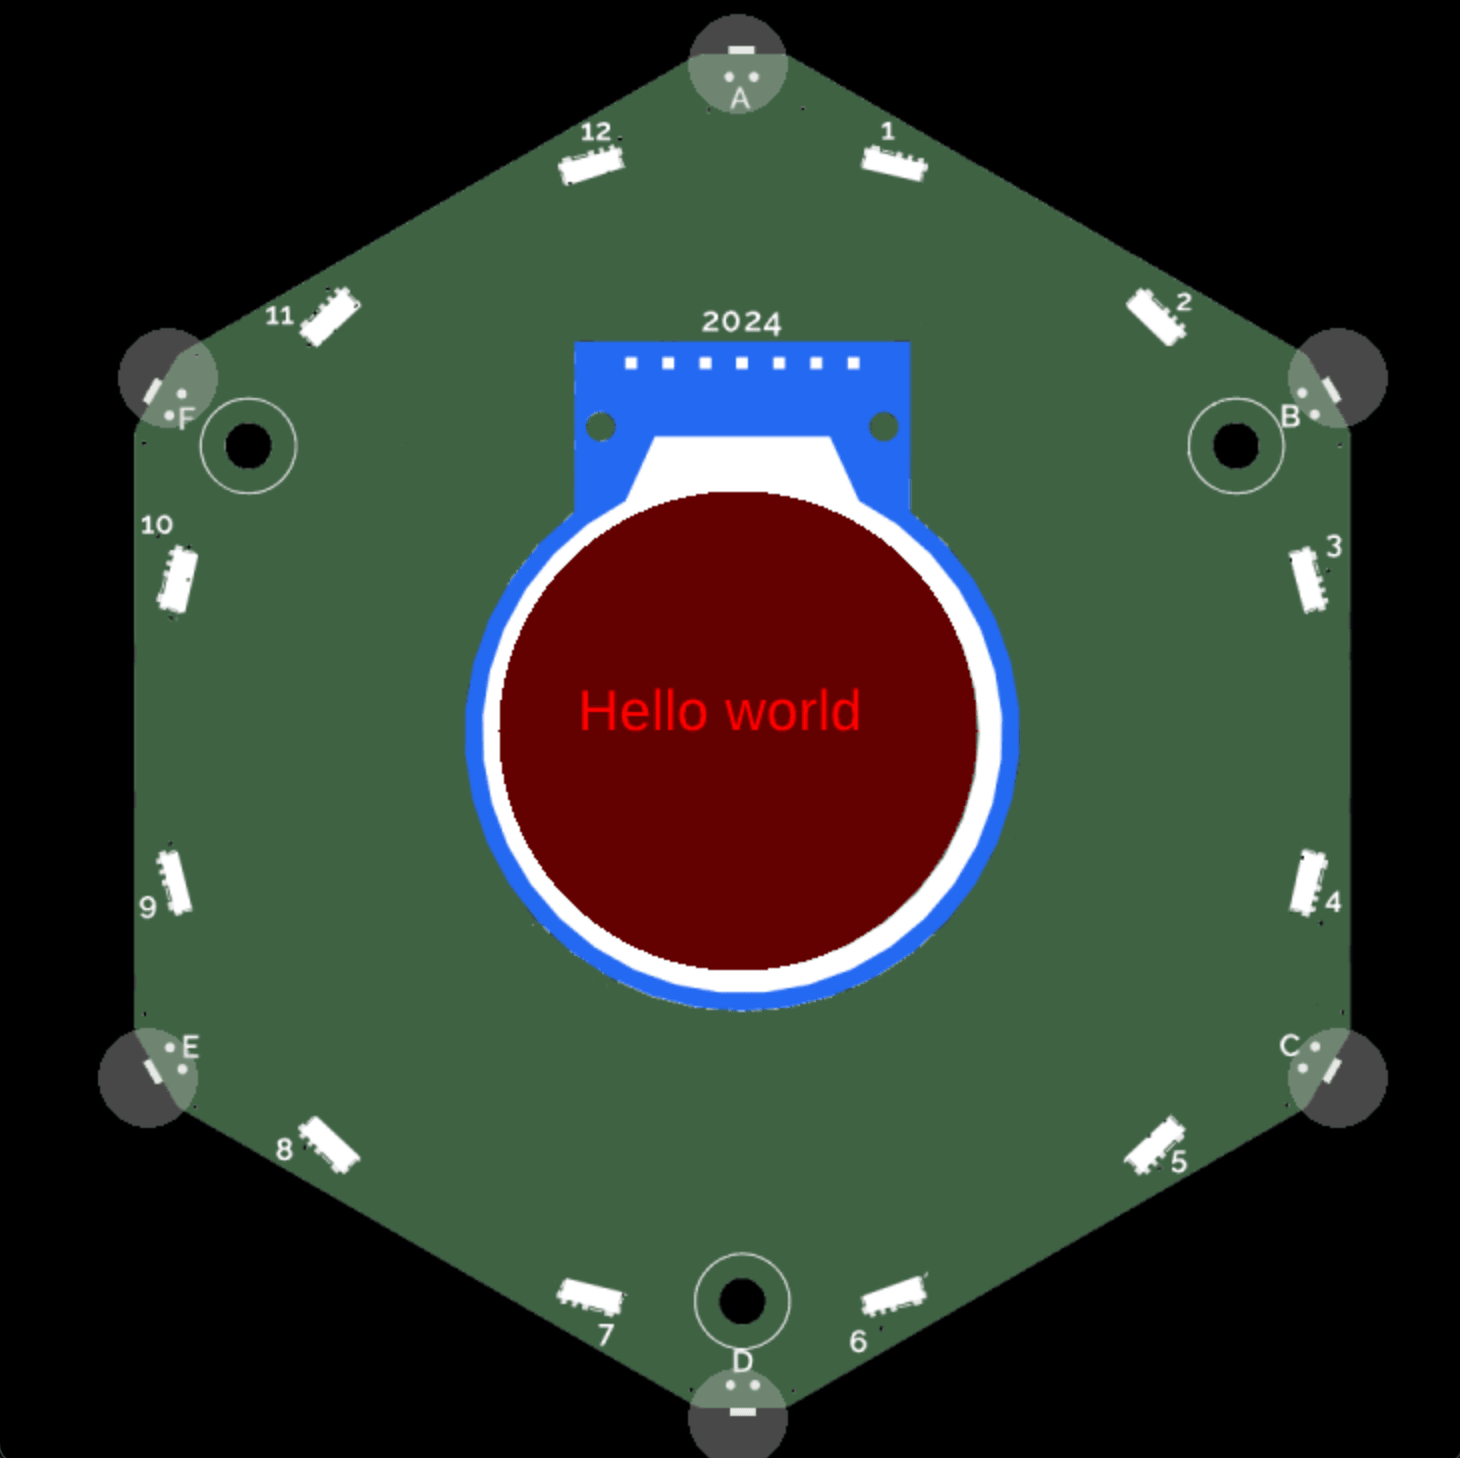
Creating text
This example adds a big, light red, filled rectangle to the canvas that is so big you won't see the edges of it. It forms the background. On top of the background, the example adds red text Hello world with the font Camp Font 2 to the canvas on top of a big rectangle that.
import app

from events.input import Buttons, BUTTON_TYPES


class ExampleApp(app.App):
    def __init__(self):
        self.button_states = Buttons(self)

    def update(self, delta):
        if self.button_states.get(BUTTON_TYPES["CANCEL"]):
            self.button_states.clear()

    def draw(self, ctx):
        ctx.save()
        ctx.font = ctx.get_font_name(5)
        ctx.rgb(0.4, 0, 0).rectangle(-120, -120, 240, 240).fill()
        ctx.rgb(1, 0, 0).move_to(-80, 0).text("Hello world")
        ctx.restore()


__app_export__ = ExampleApp
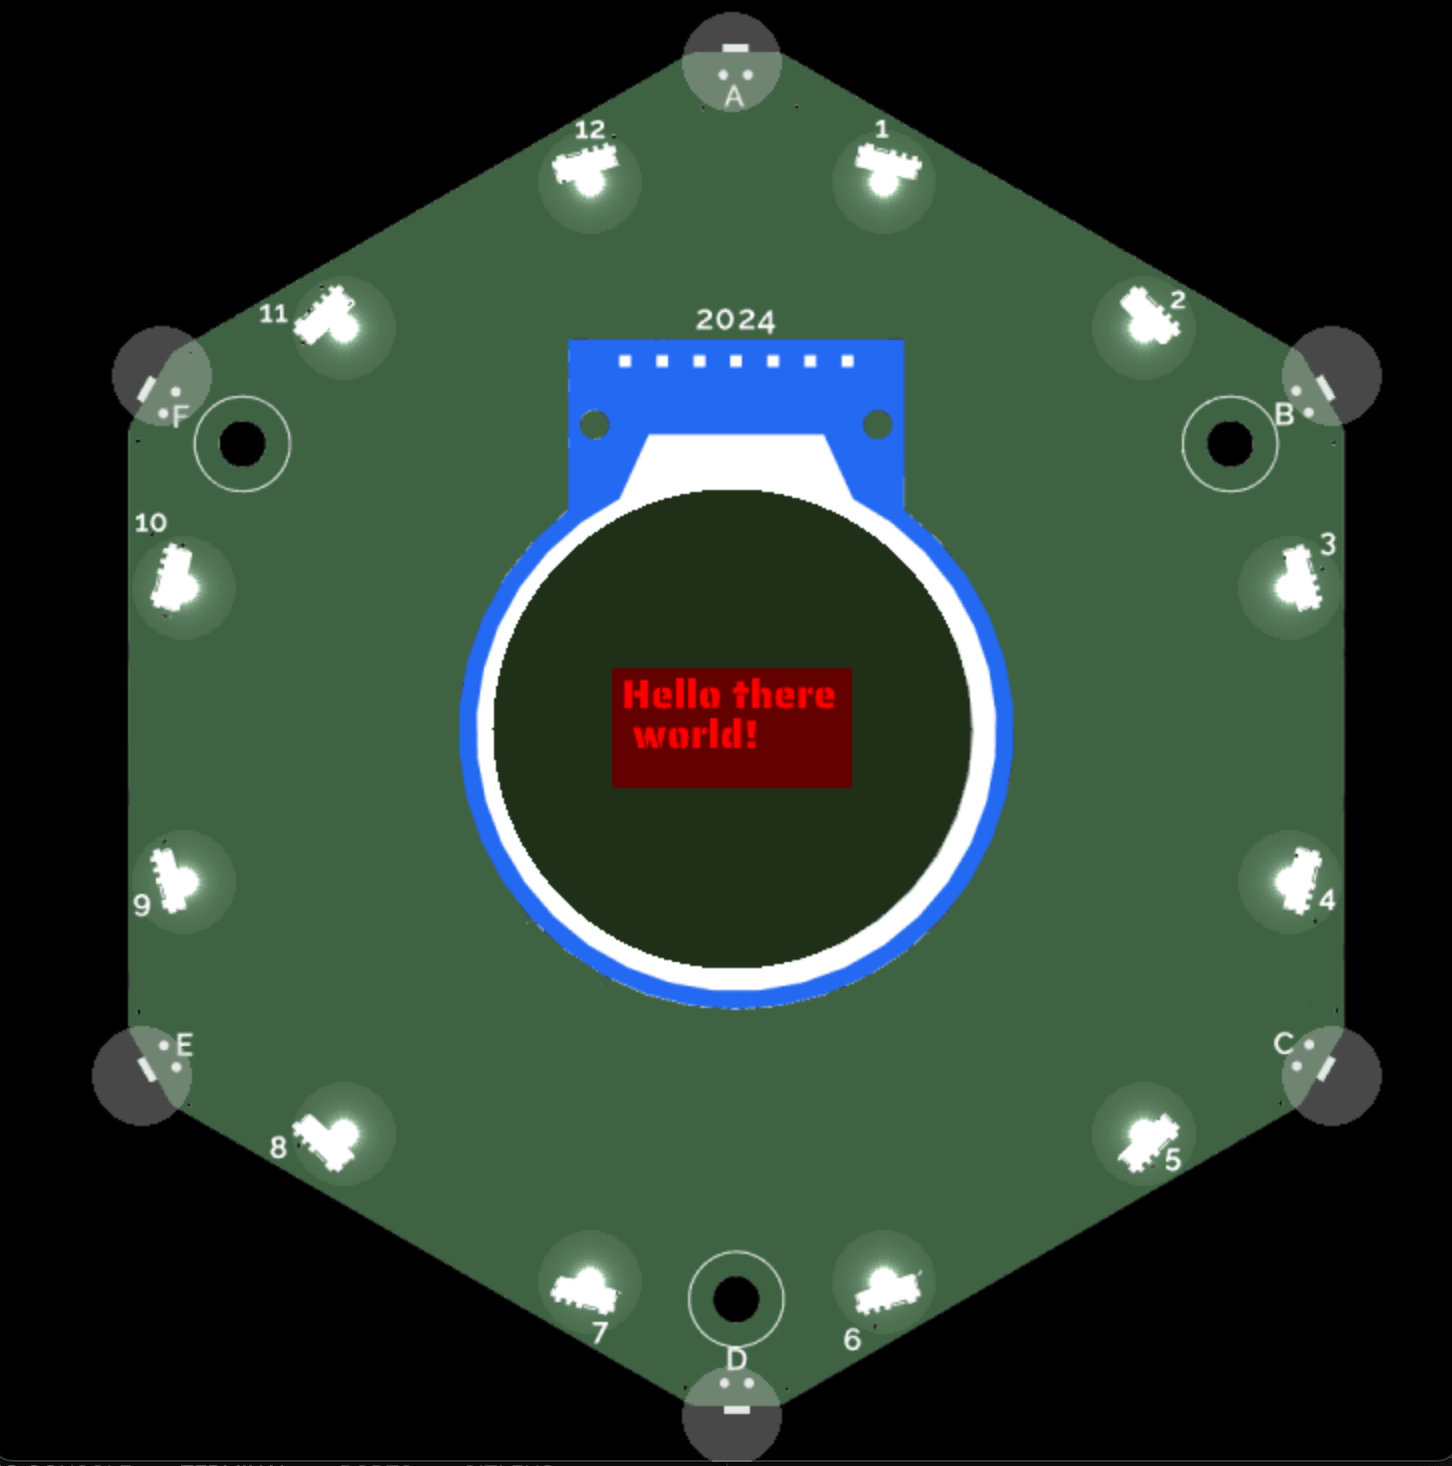
You might want to change the font or create logic to test if a certain text will fit the provided space. Here is an example that sets the font for a text and checks if text will fit into the drawn rectangle and splits the text across two lines otherwise:
import app

from app_components import clear_background
from events.input import Buttons, BUTTON_TYPES


class ExampleApp(app.App):
    def __init__(self):
        self.button_states = Buttons(self)

    def update(self, delta):
        if self.button_states.get(BUTTON_TYPES["CANCEL"]):
            self.button_states.clear()

    def reduce_text_until_fits(self, ctx, text, width_limit):
        extra_text = ""
        text_that_fits = text
        text_width = ctx.text_width(text_that_fits)
        while text_width > width_limit:
            character = text_that_fits[-1]
            text_that_fits = text_that_fits[:-1]
            extra_text = character + extra_text
            text_width = ctx.text_width(text_that_fits)
        return text_that_fits, extra_text

    def draw(self, ctx):
        clear_background(ctx)
        ctx.save()
        ctx.font = ctx.get_font_name(5)
        ctx.rgb(0.4, 0, 0).rectangle(-60, -30, 120, 60).fill()
        text = "Hello there world!"
        # we know the rectangle is 120 wide, with a margin of 5 on each side
        # that leaves 110 for text
        if ctx.text_width(text) >= 110:
            line_1, line_2 = self.reduce_text_until_fits(ctx, text, 110)
            ctx.rgb(1, 0, 0).move_to(-55, -10).text(line_1)
            ctx.rgb(1, 0, 0).move_to(-55, 10).text(line_2)
        else:
            ctx.rgb(1, 0, 0).move_to(-55, 0).text(text)
        ctx.restore()


__app_export__ = ExampleApp
Adding images
This example adds an image to the canvas. It also contains logic for getting the correct file path for the image depending on whether the app is deployed with the app store or being locally developed.
Keep image size to approximately 30KB or smaller
Images above a certain file size may cause the app to crash. The display size is approximately 240px x 240px.
import app
import sys
import os

from app_components import clear_background
from events.input import Buttons, BUTTON_TYPES

if sys.implementation.name == "micropython":
    apps = os.listdir("/apps")
    path = ""
    for a in apps:
        # This is important for apps deployed to the appstore
        # The Snake app from naomi stored at
        # https://github.com/npentrel/tildagon-snake/
        # has all its files in the folder
        # npentrel_tildagon_snake
        if a == "github_user_github_repo_name":
            path = "/apps/" + a
    ASSET_PATH = path + "/assets/"
else:
    # while testing, put your files in the folder you are developing in,
    # for example: example/streak.jpg
    ASSET_PATH = "apps/example/"


class ExampleApp(app.App):
    def __init__(self):
        self.button_states = Buttons(self)

    def update(self, delta):
        if self.button_states.get(BUTTON_TYPES["CANCEL"]):
            self.button_states.clear()

    def draw(self, ctx):
        clear_background(ctx)
        ctx.save()
        ctx.image(ASSET_PATH + "streak.jpg", -100, -100, 200, 200)
        ctx.restore()


__app_export__ = ExampleApp
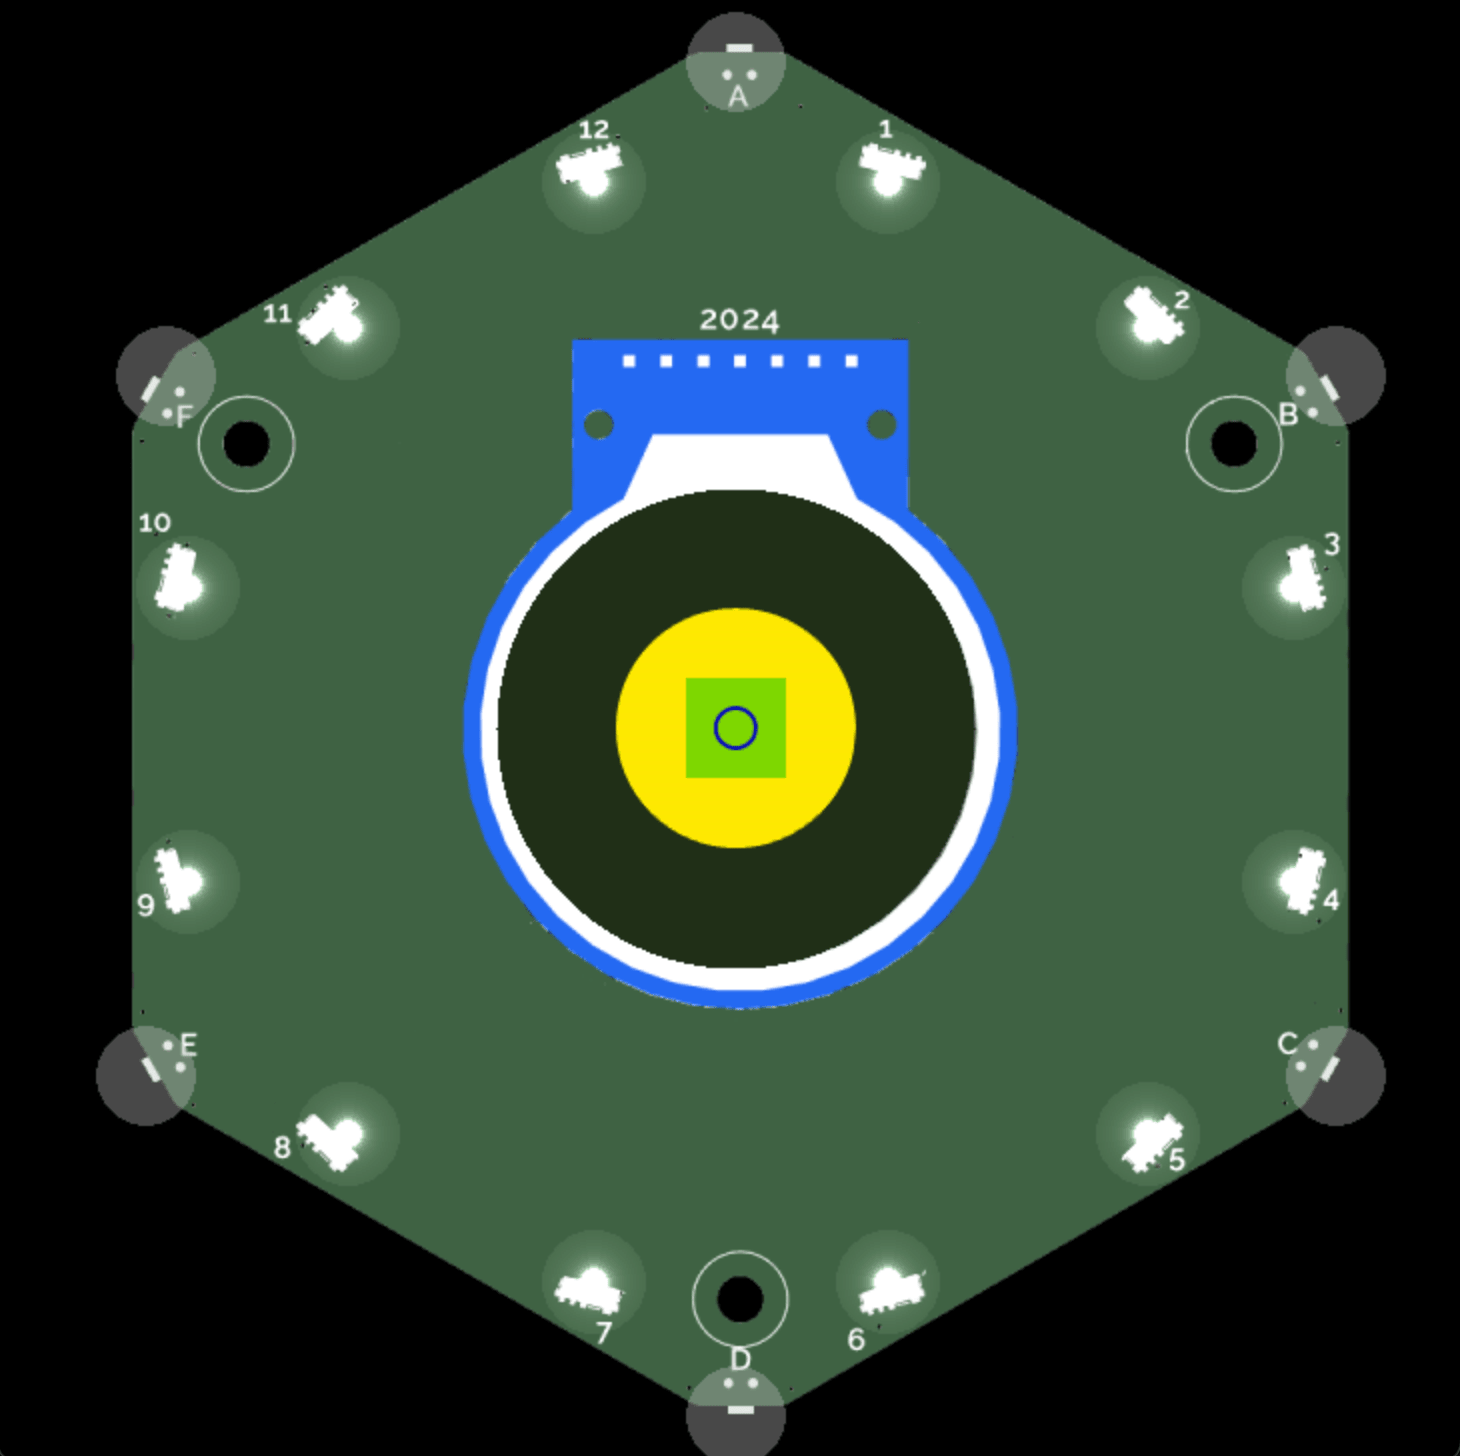
Shapes: Arcs and Rectangles
This example draws a big yellow filled circle. It then draws a filled green rectangle on top with opacity 50%. Finally, it draws the outline of a blue circle on top.
import app
import math

from app_components import clear_background
from events.input import Buttons, BUTTON_TYPES


class ExampleApp(app.App):
    def __init__(self):
        self.button_states = Buttons(self)

    def update(self, delta):
        if self.button_states.get(BUTTON_TYPES["CANCEL"]):
            self.button_states.clear()

    def draw(self, ctx):
        clear_background(ctx)
        ctx.save()
        # Yellow circle in the middle
        ctx.rgb(1, 0.92, 0).arc(0, 0, 60, 0, 2 * math.pi, True).fill()
        # Green rectangle with 50% opacity
        ctx.rgba(0, 0.78, 0, 0.5).rectangle(-25, -25, 50, 50).fill()
        # Blue circle outline
        ctx.rgb(0, 0, 0.78).arc(0, 0, 10, 0, 2 * math.pi, True).stroke()
        ctx.restore()


__app_export__ = ExampleApp
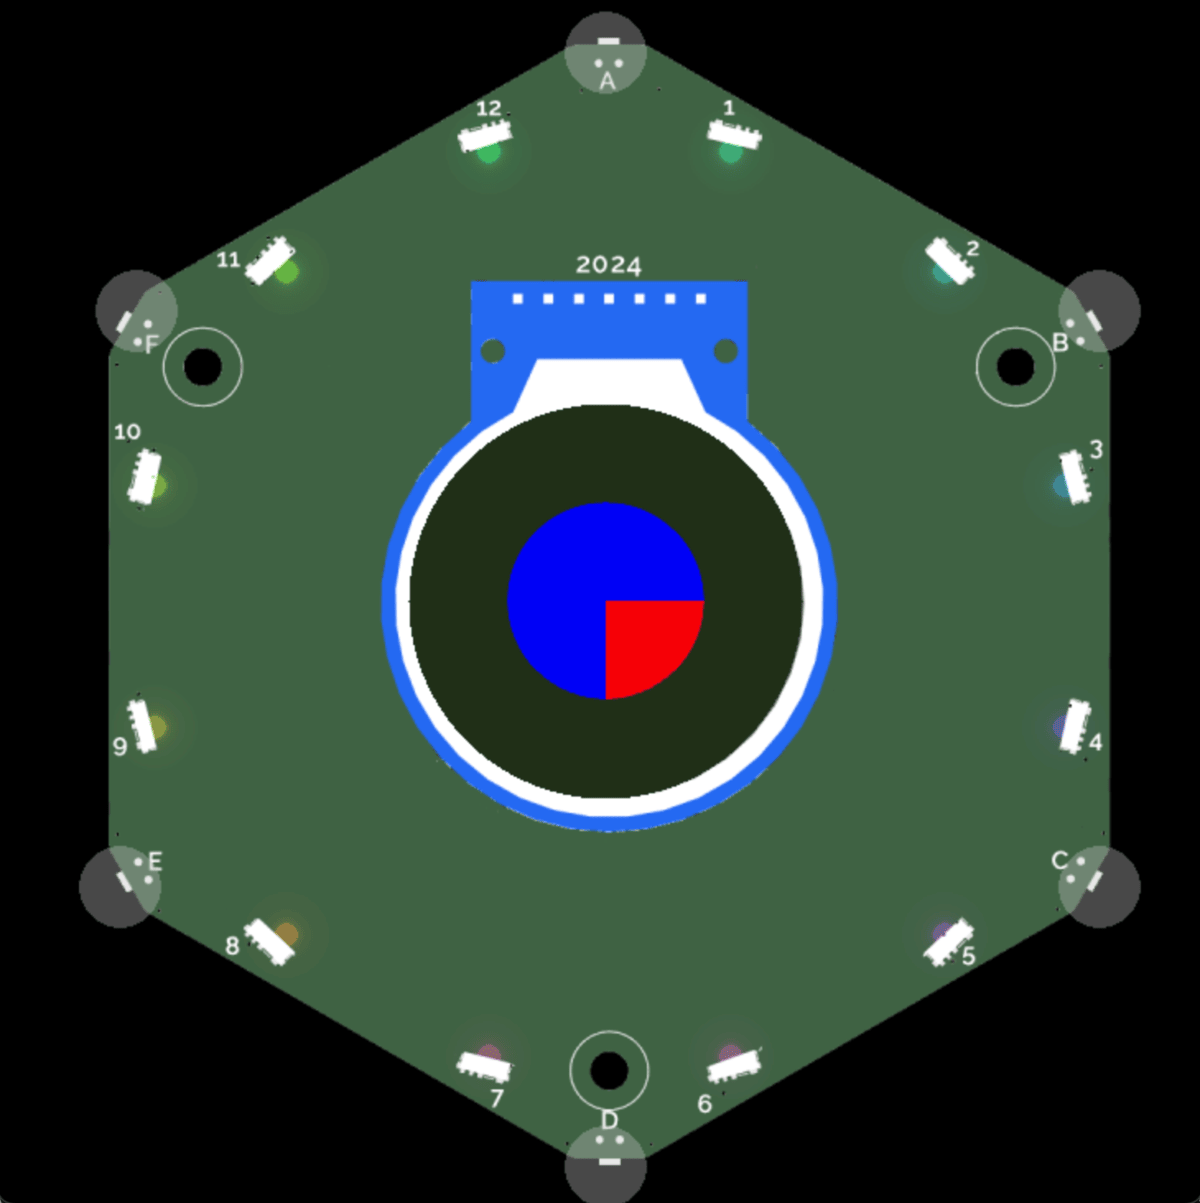
Clipping
This example draws a blue circle and clips a square out of it and colors it red, resulting in a quarter of the circle being red.
import app
import math

from app_components import clear_background
from events.input import Buttons, BUTTON_TYPES


class ExampleApp(app.App):
    def __init__(self):
        self.button_states = Buttons(self)

    def update(self, delta):
        if self.button_states.get(BUTTON_TYPES["CANCEL"]):
            self.button_states.clear()

    def draw(self, ctx):
        clear_background(ctx)
        ctx.save()
        # Blue circle
        ctx.arc(0, 0, 60, 0, 2 * math.pi, True)
        ctx.rgb(0, 0, 1).fill()

        # Define a clipping area for the circle
        ctx.arc(0, 0, 60, 0, 2 * math.pi, True)
        ctx.clip()
        # Add the shape into the clipping area
        ctx.rectangle(0, 0, 80, 80)
        ctx.rgb(1, 0, 0).fill()
        ctx.restore()


__app_export__ = ExampleApp
Scale, rotate, and translate
This example applies a scaling transformation to the canvas units vertically which makes the green rectangle 3 times as big!
import app

from app_components import clear_background
from events.input import Buttons, BUTTON_TYPES


class ExampleApp(app.App):
    def __init__(self):
        self.button_states = Buttons(self)

    def update(self, delta):
        if self.button_states.get(BUTTON_TYPES["CANCEL"]):
            self.button_states.clear()

    def draw(self, ctx):
        clear_background(ctx)
        ctx.save()
        ctx.rgb(0.4, 0, 0).rectangle(-40, 0, 40, 20).fill()
        ctx.scale(1, 3)
        ctx.rgb(0, 0.4, 0).rectangle(0, 0, 40, 20).fill()
        ctx.restore()


__app_export__ = ExampleApp
This example adds a rotation to the transformation matrix to move the previous image upside down.
import app
import math

from app_components import clear_background
from events.input import Buttons, BUTTON_TYPES


class ExampleApp(app.App):
    def __init__(self):
        self.button_states = Buttons(self)

    def update(self, delta):
        if self.button_states.get(BUTTON_TYPES["CANCEL"]):
            self.button_states.clear()

    def draw(self, ctx):
        clear_background(ctx)
        ctx.save()
        ctx.rotate(math.pi)
        ctx.rgb(0.4, 0, 0).rectangle(-40, 0, 40, 20).fill()
        ctx.scale(1, 3)
        ctx.rgb(0, 0.4, 0).rectangle(0, 0, 40, 20).fill()
        ctx.restore()


__app_export__ = ExampleApp
This example adds a translation transformation to the current matrix by moving the canvas and its origin x units horizontally and y units vertically on the grid.
import app
import math

from app_components import clear_background
from events.input import Buttons, BUTTON_TYPES


class ExampleApp(app.App):
    def __init__(self):
        self.button_states = Buttons(self)

    def update(self, delta):
        if self.button_states.get(BUTTON_TYPES["CANCEL"]):
            self.button_states.clear()

    def draw(self, ctx):
        clear_background(ctx)
        ctx.save()
        ctx.translate(-50, 0)
        ctx.rotate(math.pi)
        ctx.rgb(0.4, 0, 0).rectangle(-40, 0, 40, 20).fill()
        ctx.scale(1, 3)
        ctx.rgb(0, 0.4, 0).rectangle(0, 0, 40, 20).fill()
        ctx.restore()


__app_export__ = ExampleApp
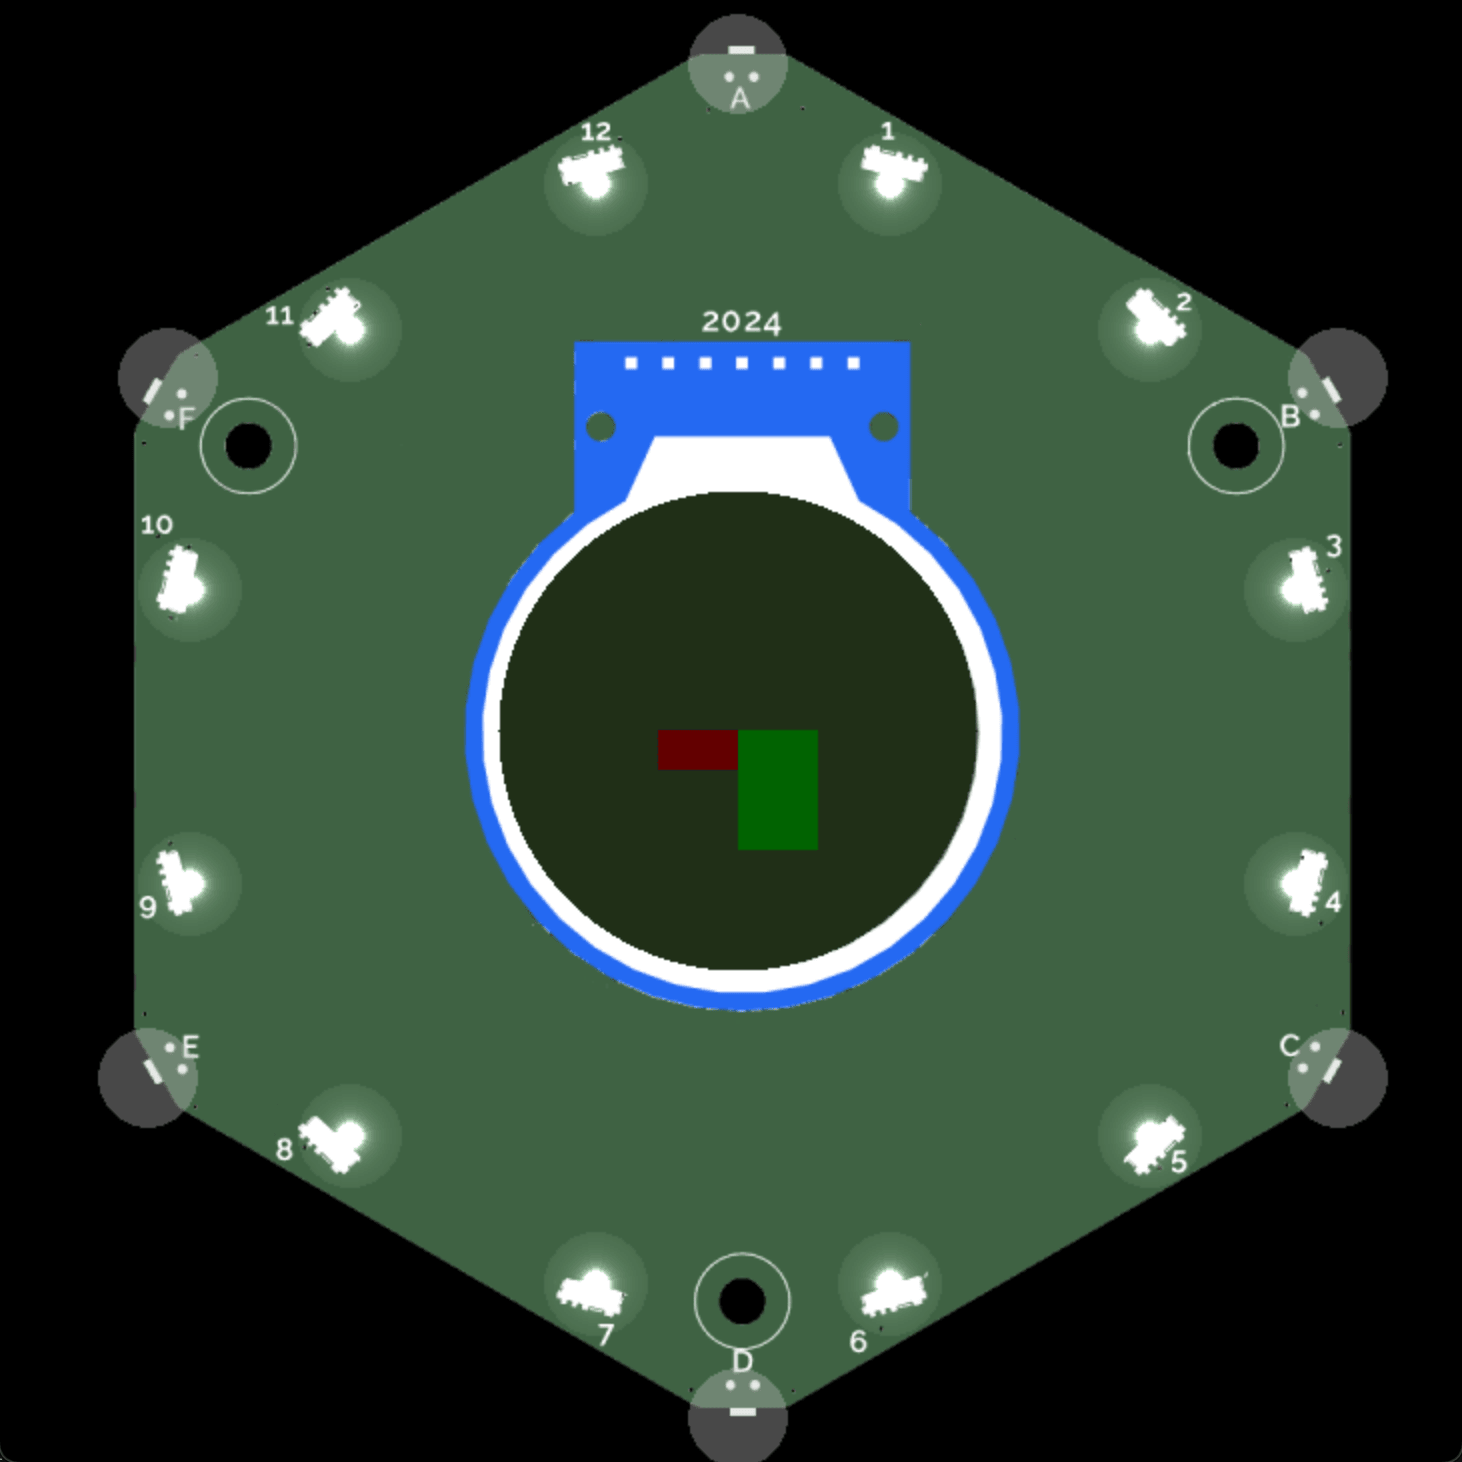
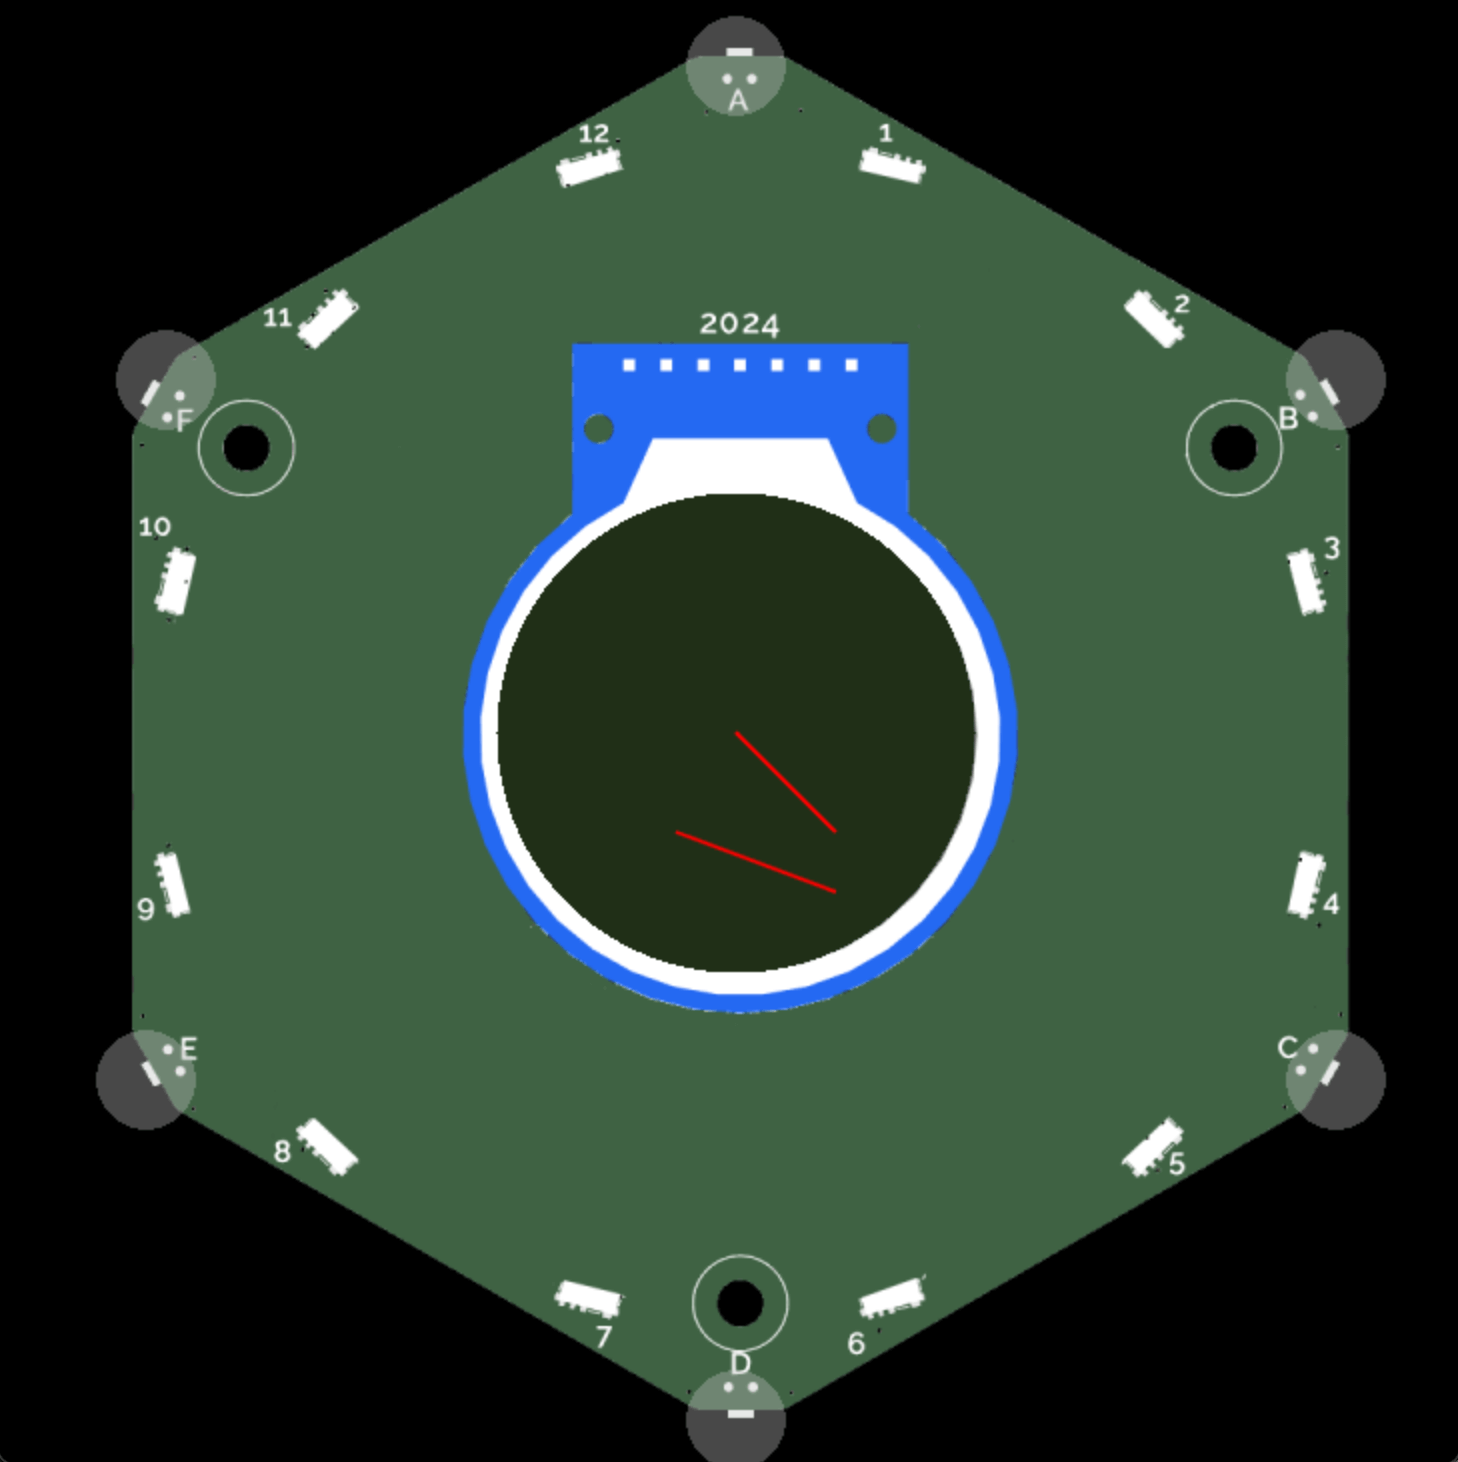
Creating multiple sub-paths
This example draws two lines in red. The first line begins at (0, 0) which is in the center and ends at (50, 50) which is towards the bottom right. The second line begins at (50, 90) and ends at (280, 120).
import app

from app_components import clear_background
from events.input import Buttons, BUTTON_TYPES


class ExampleApp(app.App):
    def __init__(self):
        self.button_states = Buttons(self)

    def update(self, delta):
        if self.button_states.get(BUTTON_TYPES["CANCEL"]):
            self.button_states.clear()

    def draw(self, ctx):
        clear_background(ctx)
        ctx.save()
        ctx.rgb(1, 0, 0).begin_path()
        ctx.move_to(0, 0)
        ctx.line_to(50, 50)
        ctx.move_to(-30, 50)
        ctx.line_to(50, 80)
        ctx.stroke()
        ctx.restore()


__app_export__ = ExampleApp
The provided example results in the following drawing:
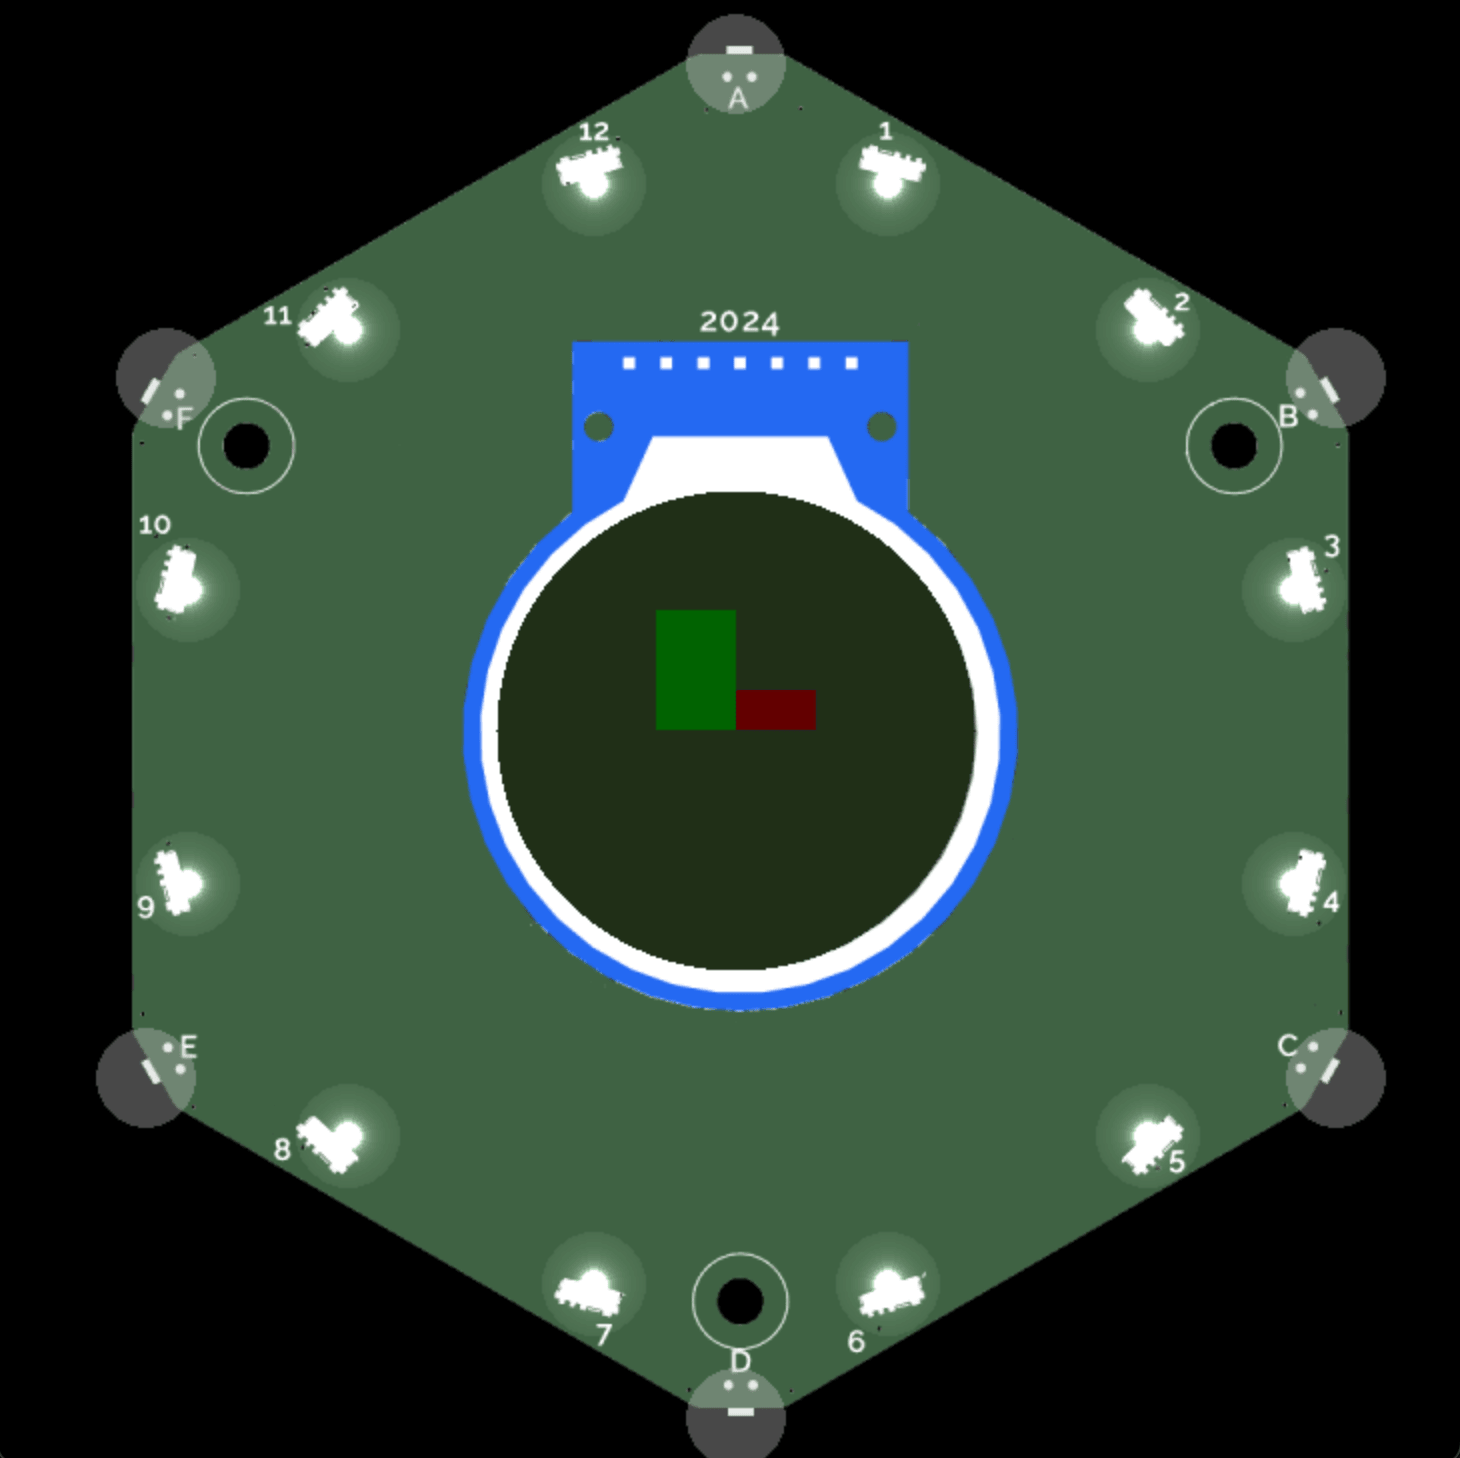
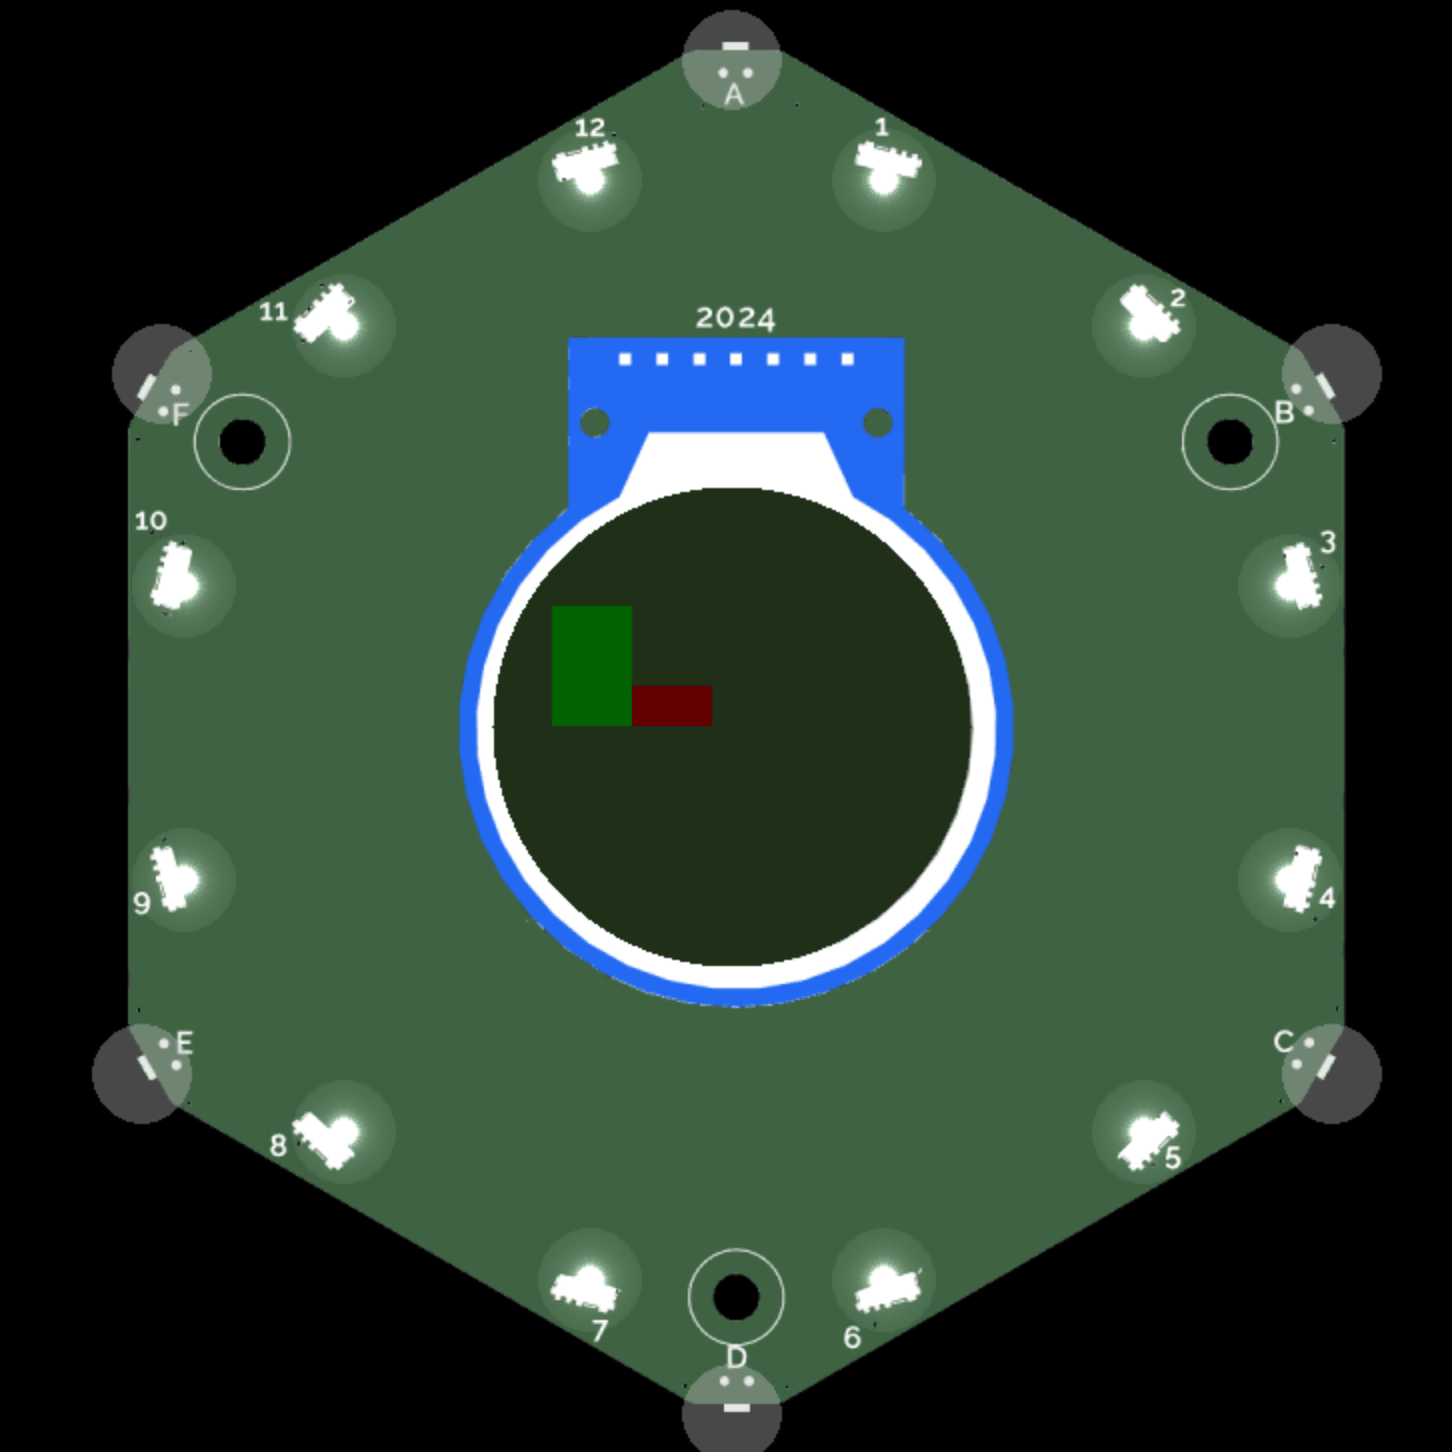
The following example changes the lines to be of different colors:
import app

from app_components import clear_background
from events.input import Buttons, BUTTON_TYPES


class ExampleApp(app.App):
    def __init__(self):
        self.button_states = Buttons(self)

    def update(self, delta):
        if self.button_states.get(BUTTON_TYPES["CANCEL"]):
            self.button_states.clear()

    def draw(self, ctx):
        clear_background(ctx)
        ctx.save()
        ctx.rgb(1, 0, 0).begin_path()
        ctx.move_to(0, 0)
        ctx.line_to(50, 50)
        ctx.stroke()
        ctx.rgb(0, 1, 0)
        ctx.move_to(-30, 50)
        ctx.line_to(50, 80)
        ctx.stroke()
        ctx.restore()


__app_export__ = ExampleApp

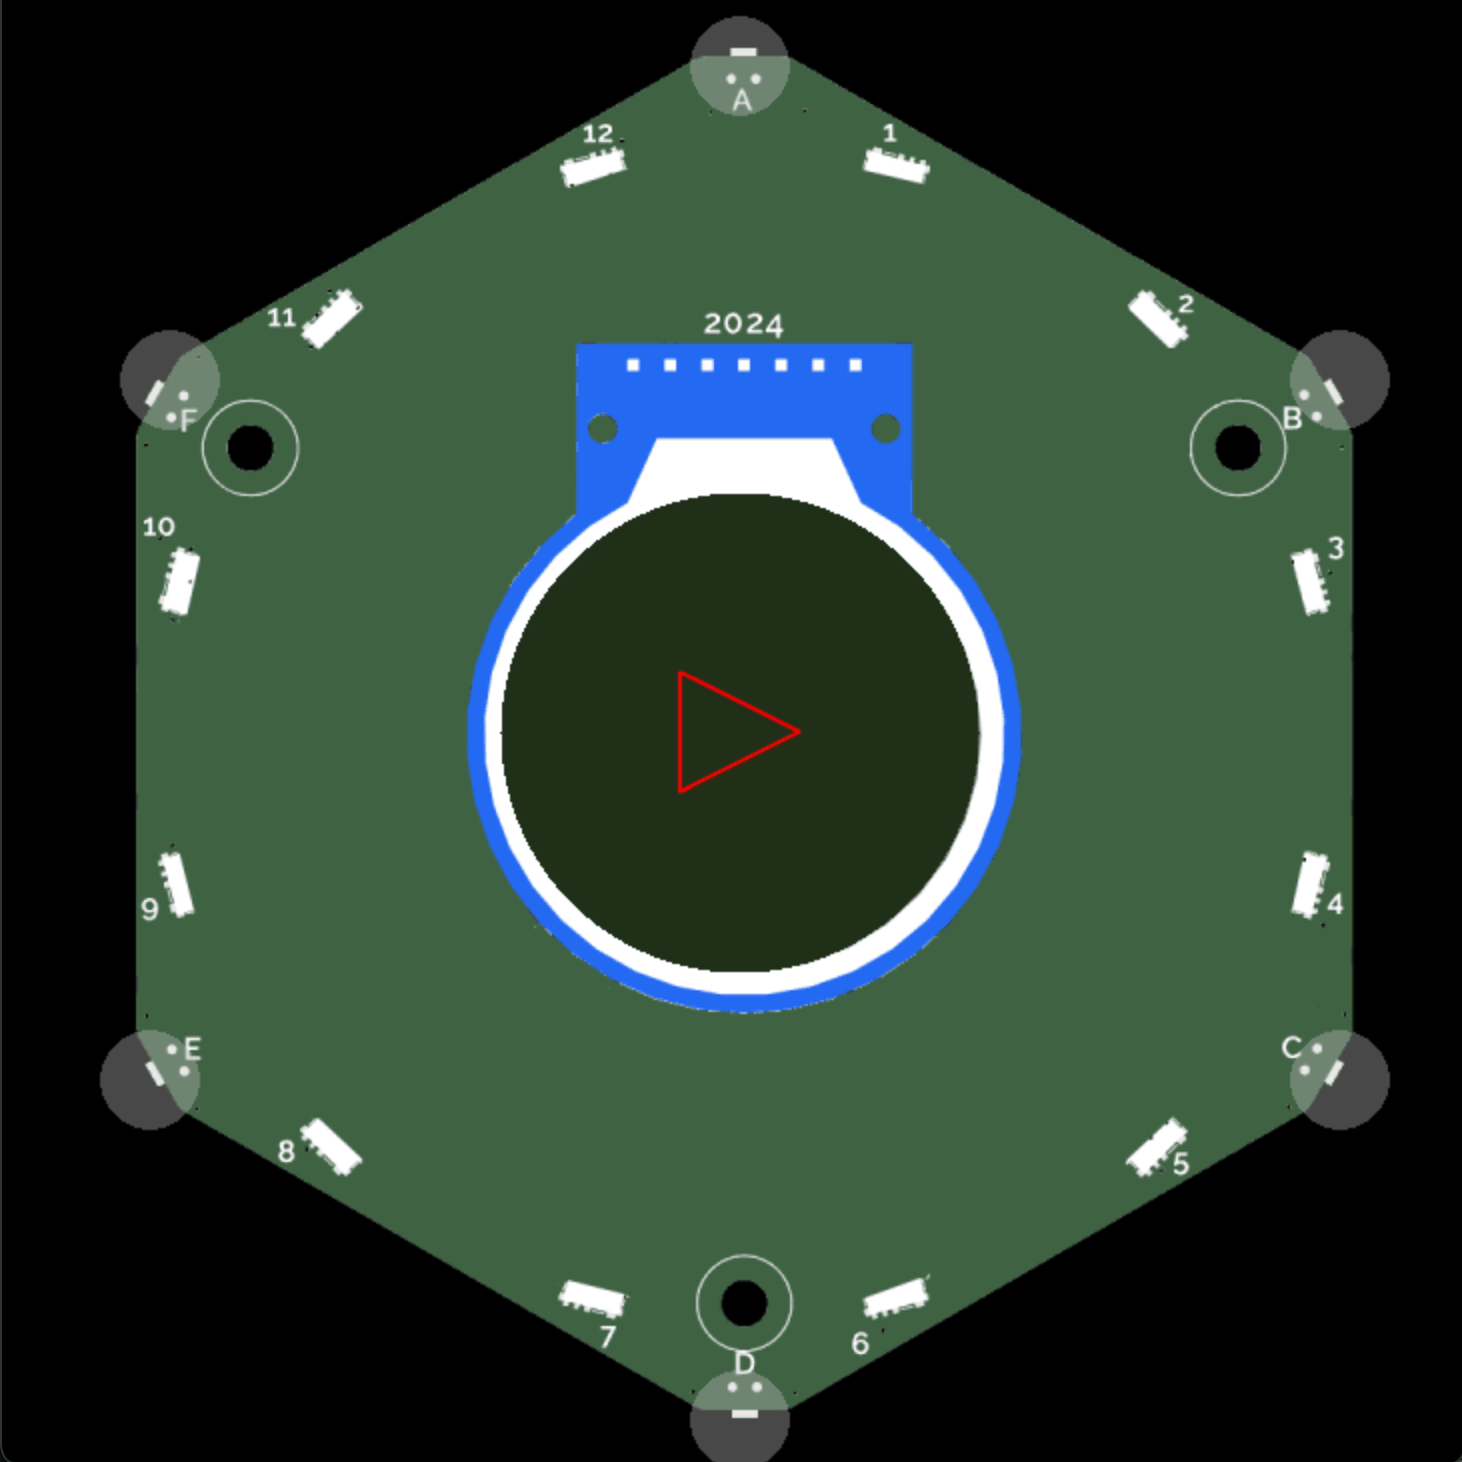
Closing a path on a triangle
This example draws a triangle.
import app

from app_components import clear_background
from events.input import Buttons, BUTTON_TYPES


class ExampleApp(app.App):
    def __init__(self):
        self.button_states = Buttons(self)

    def update(self, delta):
        if self.button_states.get(BUTTON_TYPES["CANCEL"]):
            self.button_states.clear()

    def draw(self, ctx):
        clear_background(ctx)
        ctx.save()
        ctx.rgb(1, 0, 0).begin_path()
        ctx.move_to(-30, -30)
        ctx.line_to(-30, 30)
        ctx.line_to(30, 0)
        ctx.close_path()
        ctx.stroke()
        ctx.restore()


__app_export__ = ExampleApp
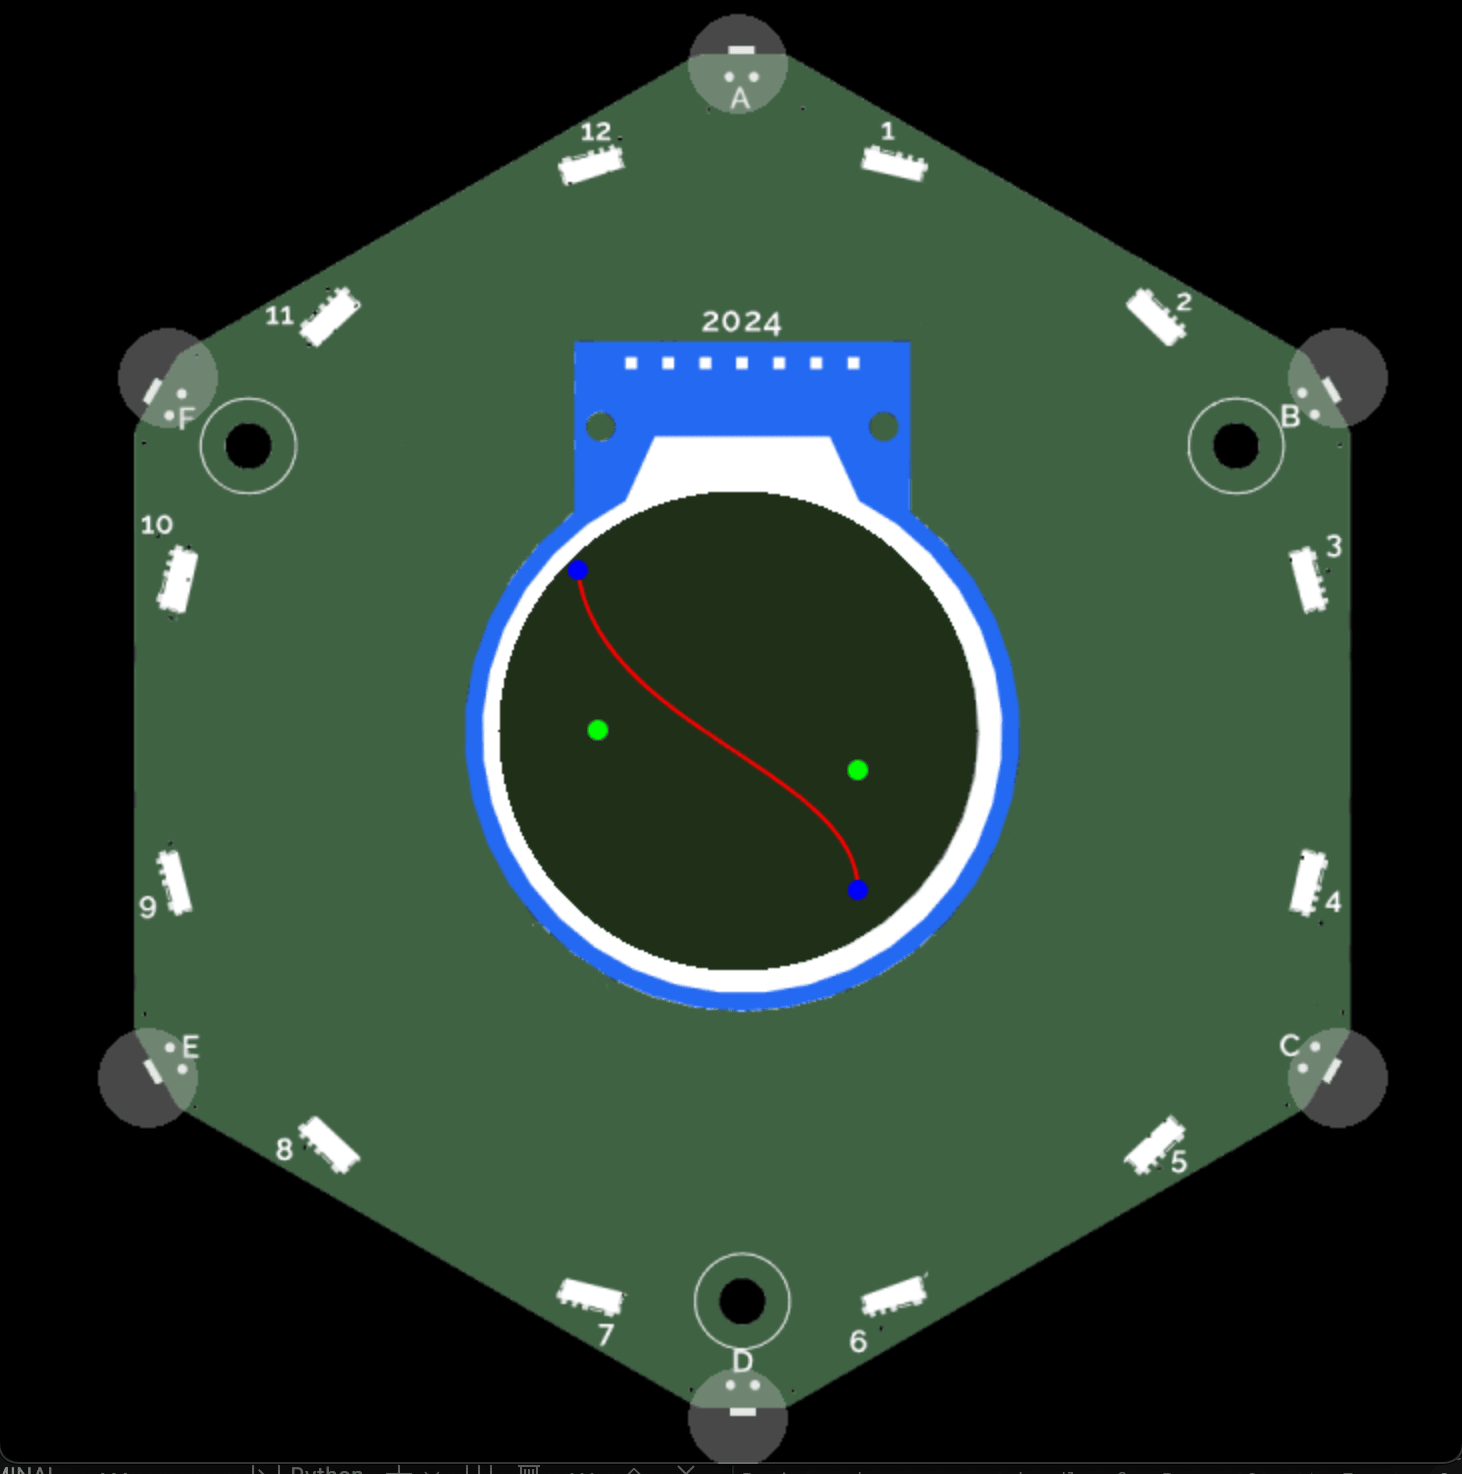
Drawing a Bézier curve
This example draws a red Bézier curve based on start and end points and the control points. The start and end points are additionally drawn in blue and green for the visualization.
import app
import math

from app_components import clear_background
from events.input import Buttons, BUTTON_TYPES


class ExampleApp(app.App):
    def __init__(self):
        self.button_states = Buttons(self)

    def update(self, delta):
        if self.button_states.get(BUTTON_TYPES["CANCEL"]):
            self.button_states.clear()

    def draw(self, ctx):
        clear_background(ctx)
        ctx.save()
        ctx.rgb(1, 0, 0).begin_path()
        # start point: (-80, -80)
        # first control point (a, b): (-70, -0)
        # second control point (c, d): (60, 20)
        # end point (e, f): (60, 80)

        # Add cubic bézier curve
        ctx.move_to(-80, -80)
        ctx.curve_to(-70, 0, 60, 20, 60, 80)
        ctx.stroke()

        # Show start and end points in blue
        ctx.rgb(0, 0, 1).begin_path()
        ctx.arc(-80, -80, 5, 0, 2 * math.pi, True)  # start point
        ctx.arc(60, 80, 5, 0, 2 * math.pi, True)  # end point
        ctx.fill()

        # Show control points in green
        ctx.rgb(0, 1, 0).begin_path()
        ctx.arc(-70, 0, 5, 0, 2 * math.pi, True)  # first control point
        ctx.arc(60, 20, 5, 0, 2 * math.pi, True)  # second control point
        ctx.fill()

        ctx.restore()


__app_export__ = ExampleApp
Methods
You can use the following methods on a ctx canvas object:
| Method | Description | Arguments | Returns |
|---|---|---|---|
move_to(x, y) | Begin a new sub-path at the point specified by the given (x, y) coordinates. |
| self: The ctx object. |
curve_to(a, b, c, d, e, f) | Add a cubic Bézier curve to the current sub-path. It requires three points: the first two are control points and the third one is the end point. The starting point is the latest point in the current path, which can be changed using moveTo() before creating the Bézier curve. |
| self: The ctx object. |
quad_to(a, b, c, d) | Add a quadratic Bézier curve to the current sub-path. It requires two points: the first one is a control point and the second one is the end point. The starting point is the latest point in the current path, which can be changed using moveTo() before creating the quadratic Bézier curve. |
| self: The ctx object. |
rel_move_to(x, y) | Begin a new sub-path at the point specified reached by adding (x, y) to the current coordinates. |
| self: The ctx object. |
rel_curve_to(a, b, c, d, e, f) | Add a cubic Bézier curve to the current sub-path relative to the current position instead of relative to (0, 0, 0). It requires three points: the first two are control points and the third one is the end point. The starting point is the latest point in the current path, which can be changed using moveTo() before creating the Bézier curve. |
| self: The ctx object. |
rel_quad_to(a, b, c, d) | Add a quadratic Bézier curve to the current sub-path relative to the current position. It requires two points: the first one is a control point and the second one is the end point. The starting point is the latest point in the current path, which can be changed using moveTo() before creating the quadratic Bézier curve. |
| self: The ctx object. |
close_path() | Attempt to add a straight line from the current point to the start of the current sub-path. If the shape has already been closed or has only one point, this function does nothing. This method doesn't draw anything to the canvas directly. You can render the path using the stroke() or fill() methods. | None. | self: The ctx object. |
translate(x, y) | Add a translation transformation to the current matrix by moving the canvas and its origin x units horizontally and y units vertically on the grid. |
| self: The ctx object. |
scale(x, y) | Add a scaling transformation to the canvas units horizontally and/or vertically. By default, one unit on the canvas is exactly one pixel. A scaling transformation modifies this behavior. For instance, a scaling factor of 0.5 results in a unit size of 0.5 pixels; shapes are thus drawn at half the normal size. Similarly, a scaling factor of 2.0 increases the unit size so that one unit becomes two pixels; shapes are thus drawn at twice the normal size. |
| self: The ctx object. |
line_to(x, y) | Add a straight line to the current sub-path by connecting the sub-path's last point to the specified (x, y) coordinates. Like other methods that modify the current path, this method does not directly render anything. To draw the path onto a canvas, you can use the fill() or stroke() methods. |
| self: The ctx object. |
rel_line_to(x, y) | Add a straight line to the current sub-path by connecting the sub-path's last point to a point moved x units horizontally and y units vertically on the grid. Like other methods that modify the current path, this method does not directly render anything. To draw the path onto a canvas, you can use the fill() or stroke() methods. |
| self: The ctx object. |
rotate(v) | Add a rotation to the transformation matrix. The rotation center point is always the canvas origin. To change the center point, you will need to move the canvas by using the translate() method. | v: The rotation angle, clockwise in radians. You can use degree * pi / 180 to calculate a radian from a degree. | self: The ctx object. |
gray(v) | Sets the color of the canvas to a color between 0.0 (black) and 1.0. | v: Intensity of the gray color. 0.0 results in black and 1.0 in white. | self: The ctx object. |
rgba(r, g, b, a) | Color the canvas in the color (r, g, b) with an alpha channel. |
| self: The ctx object. |
rgb(r, g, b) | Color the canvas in the color (r, g, b). |
| self: The ctx object. |
text(s) | Draw the provided text on the canvas. | s: The text to draw provided as a string. | self: The ctx object. |
round_rectangle(x, y, width, height, radius) | Add a rounded rectangle on the canvas at position (x, y) with the provided width, height, and corner radius. |
| self: The ctx object. |
image(path, x, y, w, h) | Draw an image to be read from the provided path onto the canvas. |
| self: The ctx object. |
rectangle(x, y, width, height) | Add a rectangle to the current path. Like other methods that modify the current path, this method does not directly render anything. To draw the rectangle onto a canvas, you can use the fill() or stroke() methods. The rect() method creates a rectangular path whose starting point is at (x, y) and whose size is specified by width and height. |
| self: The ctx object. |
stroke() | Stroke (outline) the current or given path with the current stroke style. | None. | self: The ctx object. |
save() | Save the entire state of the canvas by pushing the current state onto a stack. | None. | self: The ctx object. |
restore() | Restore the most recently saved canvas state by popping the top entry in the drawing state stack. If there is no saved state, this method does nothing. | None. | self: The ctx object. |
fill() | Fill the current or given path. | None. | self: The ctx object. |
radial_gradient(x0, y0, r0, x1, y1, r1) | Create a radial gradient using the size and coordinates of two circles. |
| self: The ctx object. |
linear_gradient(x0, y0, x1, y1) | Create a gradient along the line connecting two given coordinates. |
| self: The ctx object. |
add_stop(pos, color, alpha) | Adds a color stop in a gradient with the provided position, color, and alpha values. |
pos: The position of the stop determining the order of the stops. | self: The ctx object. |
begin_path() | Start a new path by emptying the list of sub-paths. Call this method when you want to create a new path. | None. | self: The ctx object. |
arc(x, y, radius, arc_from, arc_to, direction) | Add a circular arc to the current sub-path. |
| self: The ctx object. |
text_width(text) | Calculate the width of the provided text. | text: The text to calculate the width of. | width: The width of the provided text. |
clip() | Turn the current or given path into the current clipping region. The previous clipping region, if any, is intersected with the current or given path to create the new clipping region. For a visual example, see the mdn web docs. | None. | self: The ctx object. |
get_font_name(i) | Get the name of one of the 9 fonts: "Arimo Regular", "Arimo Bold", "Arimo Italic", "Arimo Bold Italic", "Camp Font 1", "Camp Font 2", "Camp Font 3", "Material Icons", and "Comic Mono". | i: The number of the font to get the name of. A number between 0 and 8. | font_name: The font. |